

Quck answer
Cannas are tropical flowering plants that can add a vibrant touch to any garden. To grow cannas, start by selecting a sunny spot with well-drained soil. Plant the rhizomes in spring, about 4-6 inches deep. Water regularly, keeping the soil moist but not waterlogged. Fertilize every 4-6 weeks during the growing season. Cannas thrive in warm climates and should be protected from frost. In colder regions, dig up the rhizomes before winter and store them in a cool, dry place. With proper care, cannas can grow into stunning plants with beautiful blooms.
If luck truly favors those who are bold, then the perennial canna (Canna indica) flower should have no trouble attracting fortune in your garden. These vibrant plants showcase large, confident leaves in solid green, bronze, or variegated hues. The canna’s leaves alone are enough to leave a lasting impression, but they go even further by producing flowers in stunning shades of red, orange, yellow, and pink. Cannas continue to bloom all summer long, putting on a captivating display from spring until the arrival of frost.
Tall and majestic, cannas can reach heights of up to 8 feet. However, dwarf varieties stay smaller, growing only to 3 or 4 feet in height. Clumps of cannas can spread to a width of approximately 6 feet, but most individual plants maintain an upright form, remaining a narrow 1 1/2 feet wide.
Optimal Uses for Cannas
Due to their impressive height and upright growth habit, cannas are an excellent choice for creating a tall border or filling a narrow planting bed. Although some varieties are native to North America, these plants have a tropical appearance that also complements swimming pools. Additionally, since cannas can tolerate some moisture, they can be planted around backyard ponds. However, they do not tolerate salt spray, so it is advisable to choose a different species if planting near the coast or at a beach house.
Some gardeners prefer to grow cannas in large containers or pots, using them as a central focal point. Cannas pair well with colorful annuals, but they also complement grasses and other plants that provide height without adding much color. Whether used to make a vivid statement or scattered throughout the garden for unexpected bursts of captivating color, cannas are a versatile choice.
How to Cultivate Cannas
- Common Name: Canna, canna lily
- Botanical Name: Canna indica
- Best Planting Time: Wait until nighttime soil temperatures are above 60 degrees Fahrenheit
- USDA Zones: 8-11
- Sun Exposure: Full sun
- Soil Type: Loamy
- Signs of Trouble: Weak stems, yellow streaks or spots on leaves
- Signs of Thriving: Large, upright leaves and vibrant flowers
Starting Cannas From a Rhizome
Attempting to grow cannas from seeds is an arduous task, as the seeds have a very low germination rate and possess an extremely tough outer shell. Gardeners must break through this shell by filing it away or subjecting the seeds to an acid bath. It is much simpler and safer to start cannas from rhizomes, which are modified stems that spread just beneath or at the soil surface.
Although many gardeners and garden centers refer to them as bulbs, the pieces of canna that are planted are actually sections of a rhizome. Ideally, the rhizome should be several inches long and contain three to five eyes.
To begin the planting process, spread a 4-inch layer of compost over the planting bed. Work the compost into the soil, loosening it to a depth of 12 to 15 inches. Dig a planting hole approximately 3 inches deep and place the rhizome in it with the eyes facing upward. Do not worry if some eyes face up while others face down, as the sprouts from downward-facing eyes will adjust their growth as the plant develops.
Planting Cannas: Spacing and Watering
When planting cannas, make sure to space your rhizomes approximately 4 feet apart. Fill the holes with soil, firmly tamp it down over the rhizomes, and water your new plantings. Unless the soil is dry due to drought conditions, avoid watering the young cannas until sprouts emerge from the soil. Once sprouts appear, water the plants once a week by soaking the soil around them.
Image Credit:
Pabitra Chakraborty/iStock/GettyImages
Best Growing Zone for Cannas
Cannas can be grown as perennials in USDA hardiness zones 7 through 11. In some parts of zone 7, the plants may or may not survive winter outdoors, depending on the severity of the cold season. To be safe, gardeners in zone 7 should winterize their cannas or dig up the rhizomes after the first fall frost and store them indoors until spring. This eliminates the need to purchase new plants annually.
Optimal Planting Time for Cannas
Plant cannas in the spring when the soil temperature remains above 60 degrees Fahrenheit throughout the night. For an extended blooming period, start the cannas indoors a few weeks prior to the last frost. Outdoor planting should coincide with the timing of tomato plant installation.
Soil, Sunlight, and Watering Recommendations for Cannas
Cannas thrive in soil with a pH level between 6.0 and 6.5. If the soil is more acidic, it is advisable to amend it with lime before planting. While loamy soil is ideal, cannas can tolerate moist soil. Position the plants in an area where they receive a minimum of four hours of direct sunlight daily and where they are protected from strong winds. The large leaves of cannas are prone to toppling over during heavy winds if not sheltered.
Although most cannas can support their weight without assistance, stake top-heavy plants if necessary to maintain their upright position. If there is insufficient rainfall, provide approximately one inch of water per week. Mulching around the cannas helps conserve water and suppress weed growth.
During the growing season, cannas require about an inch of water per week. In early spring, it is recommended to fertilize them with a 5-10-5 fertilizer. If desired, additional fertilization can be done twice more during the growing season. Fish emulsion, tomato, or rose fertilizers are also suitable options for cannas. However, these fertilizers are nitrogen-rich and may cause the plants to grow taller. To encourage new blossoms, remove faded canna flowers throughout the season.
Propagation of Cannas
If you wish to expand your canna plant collection, dividing the rhizomes is a viable method. However, this should be done in the spring, so plan accordingly. In the fall, dig up the canna rhizomes and store them in a cool, dry place such as a garage or basement for the winter.
When spring arrives, cut the rhizome into new sections before planting. Each section should contain three to five eyes, or growing buds. The more eyes on the rhizome, the more leaves and flowers the new plant will produce. Allow the freshly cut rhizomes to dry and heal for a few days before planting. For optimal results, divide canna plants only once every three or four years.
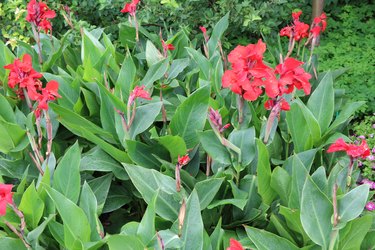
Image Credit:
ClaraNila/iStock/GettyImages
How to Prepare Cannas for Winter
If you are in hardiness zone 8 or a warmer region, you can leave your cannas in the ground during winter without any worries. Simply trim the plant stems to a height of 4 inches in late autumn and let the plant take care of itself. However, if you live in zone 7, there is a possibility that the winter temperatures could be cold enough to harm your cannas. In such cases, you have two options for overwintering the plant.
One option is to leave the rhizomes in the ground but provide additional insulation in case of freezing temperatures. Trim the plant stems as usual and then cover the plant and the surrounding area with about 4 to 6 inches of mulch. This extra insulation should help protect the plant from sudden cold spells.
If you are expecting an unusually cold winter, it is advisable to dig up your cannas and bring them indoors for protection until spring. Trim the plant to a height of 2 to 3 inches. Use a trowel to loosen the soil about a foot away from the trimmed stems. Once the soil is loose, carefully dig closer to the canna rhizome with your fingers and lift it from the ground without causing any damage.
Remove any dirt from the rhizomes and cut off any remaining foliage. Allow the rhizomes to dry completely by placing them in the garage or basement for a few days. Wrap the dry rhizomes in newspaper along with some dry peat moss and store them in a dry place where the temperature remains above 40 degrees. Store each rhizome separately.
If necessary, you can lightly sprinkle water over the canna rhizomes a few times during winter, but only if they are completely dry. Excessive water can lead to rotting of the rhizomes. Water them sparingly and if in doubt, keep them dry. The aim is to prevent the rhizomes from drying out without promoting rot.
Common Pests and Other Issues for Cannas
Occasionally, caterpillars, slugs, and snails may visit cannas. They usually do not cause significant damage, but they can create noticeable holes in the plant’s large leaves. If you notice these insects, remove them by hand or spray your plants with Bacillus thuringiensis, a natural soil bacterium that kills many insects. Apart from these common garden visitors, cannas generally do not attract any unwanted attention and may even attract hummingbirds.
Common Diseases for Cannas
Rust, fungal leaf spot, and bacterial blight are some diseases that can affect cannas. These diseases can often be prevented by ensuring proper plant spacing to improve air circulation and following good gardening practices. Regularly remove dead plants, fallen leaves, and debris from around your plants, keep weeds under control, and avoid working in the garden when it is wet. When watering the plants, direct the water towards the ground and try to prevent wetting the foliage.
There are several fungicides and plant treatments available to address these issues, and it is worth trying them if you catch the infections early. However, if the situation seems to be getting worse, it is recommended to remove and dispose of the affected plants before they spread the disease to others.
