
Quck answer
To build a simple retaining wall for your garden, follow these steps:
1. Choose the location: Find a spot in your garden where the wall will provide support and prevent soil erosion.
2. Gather materials: You will need bricks or concrete blocks, gravel, sand, and a shovel.
3. Excavate the area: Dig a trench that is slightly wider and deeper than the height of your wall. This will provide stability.
4. Level the trench: Use a level to ensure the trench is even and flat.
5. Lay the foundation: Fill the trench with gravel and compact it using a tamper.
6. Lay the first row: Place the bricks or concrete blocks side by side, making sure they are level.
7. Build subsequent rows: Continue placing blocks on top of each other, staggering them for added stability.
8. Backfill the wall: Fill the space behind the wall with gravel or sand, compacting it as you go.
9. Finish the wall: Add a capstone or top layer of bricks or blocks to complete the wall.
10. Maintain the wall: Regularly check for any signs of damage or shifting, and make necessary repairs.
By following these steps, you can easily build a simple retaining wall for your garden that will provide both functionality and aesthetic appeal.
A retaining wall is a versatile landscaping feature that can enhance the appearance of your yard while also preventing erosion in sloping areas. It can also create level spaces for planting beds or hardscapes like patios. While concrete retaining wall blocks are a popular choice, landscape timbers and natural stone can also be used for a DIY-friendly project.
A small retaining wall typically does not require a permit and can be completed within a weekend.
Understanding the Basics of Retaining Walls
The material you choose for your retaining wall will determine its aesthetics and construction requirements. Retaining wall blocks are secured with spikes or designed to fit tightly with each layer. Timbers are also held together with long spikes.
Natural stone walls are dry stacked, meaning the arrangement and placement of stones hold the wall together. This technique requires skill, especially with round stones. Flat-sided cut stones are easier for beginners to use. The Landscaping Network’s comparison chart provides information on retaining wall block options, landscape timbers, and natural stone.
Retaining walls are not perfectly vertical; they lean back into the slope behind them to resist soil and moisture pressure. This angle, known as batter, is automatically achieved with retaining wall blocks. However, installers need to create this setback when working with landscape timbers and natural stone walls.
Despite the differences in materials, the overall construction process for retaining walls is similar. The building sequence ensures a stable wall that prevents water damage.
Planning Your Retaining Wall
Most DIY retaining walls are no taller than 3 or 4 feet. Higher walls usually require professional installation and additional reinforcement, such as geotextile fabric that connects the retaining wall blocks to the slope. While a permit may not be necessary for short walls, many towns require one for walls over 4 feet. Contact your local building department for specific permit requirements.
For straight walls, use string lines attached to stakes at each end. Retaining wall blocks can be used to create curved walls, which can be marked out using paint or a garden hose.
Ensure that the area behind the wall is level with the top of the wall in your design. If the wall is slightly higher, water may accumulate behind it. Good retaining wall construction includes an effective drainage system, but it’s best to allow excess water to flow over the top rather than seep behind the wall.
When it comes to obtaining materials, estimating the necessary amount of material for a retaining wall can be challenging. Inch Calculator offers a solution by providing the number of blocks required for a project based on the dimensions of the blocks and the height and width of the wall that you input.
Before you begin digging, it is important to call 811, the national “call before you dig” hotline. This will connect you with local utility companies who will visit your property to mark the locations of buried electric, gas, and water lines. This step is particularly crucial if you are constructing a wall that faces the street, as most buried utilities are located there.
Here is a list of the materials you will need:
– 3/4-inch gravel
– Retaining wall material (such as retaining wall blocks, landscape timbers, or natural stone)
– Wood preservative (if applicable)
– Landscape fabric
– Drain tile (either PVC or corrugated flexible pipe)
– Cap stones (if applicable)
– Concrete adhesive (if applicable)
– Topsoil
– Shovel
– Rake
– Tamper
– Level
– Rubber mallet
– Eye protection
– Circular saw with appropriate blades
– Clamps
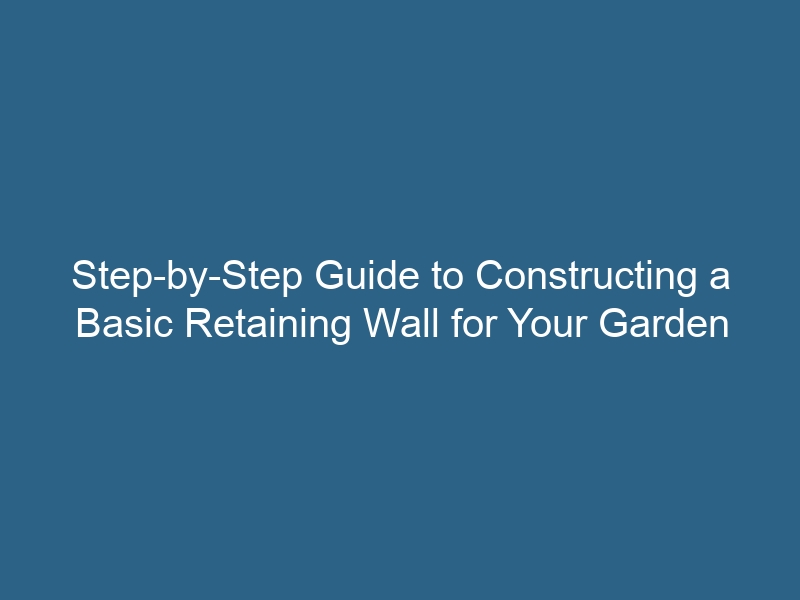
Next, I have included an image for reference:
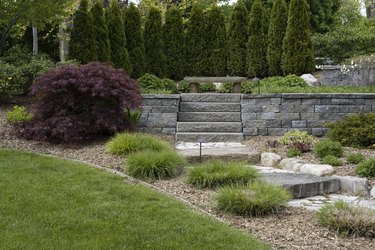
Image Credit:
RiverNorthPhotography/iStock/GettyImages
Now let’s move on to the steps involved in building a retaining wall.
Step 1: Create the Anchor Trench
Start by digging a trench that can accommodate the first layer (or course) of your chosen retaining wall material. The width of the trench should be twice as wide as the material, and the depth should match the height of the material plus an additional 6 inches. Tamp down the soil at the bottom of the trench to create a sturdy base for the wall.
Step 2: Prepare the Slope
Excavate the slope located about 12 inches behind where the wall will be constructed. This area will be used for creating a drainage system. Note that if you are using landscape timbers, you will need to install reinforcement that extends into the slope, which will require additional digging.
Step 3: Provide a Base for the Wall
Pour 6 inches of gravel into the trench, ensuring that it is level and smooth. This layer of gravel will help with drainage beneath the wall and assist in leveling the first course of material.
Step 4: Install the First Course
Place your chosen wall material into the trench, burying the first course for stability. Make sure to level the material. You may need to adjust the gravel beneath the material or use a rubber mallet to achieve a level first course.
Step 5: Install the Second Course
Offset the joints of the material in the second course from those in the first. Aligning seams weakens the wall. To offset the joints, begin the second course with half a concrete block or timber. When using natural stone, you can usually select the appropriate size of stone to offset the joints, eliminating the need for cutting. However, if you need to trim a block or timber, remember to wear eye protection and use a circular saw with a concrete blade for concrete retaining wall blocks.
When working with concrete blocks, you should mark the area to be cut and secure the block to a stable surface. It may be necessary to make multiple cuts with the saw to fully break through. Use a circular saw with a standard wood-cutting blade to cut timbers. Apply wood preservative to the cut ends of the timbers.
Step 6: Starting the Construction of the Drainage System
Place the landscape fabric against the exposed part of the slope. The fabric should extend from the bottom of the wall to the future top of the wall, with an additional 12 inches. This fabric allows groundwater to pass through while filtering out soil and debris.
Step 7: Installing the Drain Tile
Create a 2-inch layer of gravel behind the existing courses, leading back to the slope. Position the drain tile, which is a drainage pipe, along the entire length of the wall. Slope the pipe so that any collected water moves away from the base of the wall. Cover the pipe with gravel.
Image Credit:
jorgeantonio/iStock/GettyImages
Step 8: Continuing the Wall Construction
Place each course of the wall, ensuring that the joints are staggered and the wall material is level. Backfill with gravel as you progress with each course. Eventually, you will have a gravel section that drains water away from the wall.
Step 9: Adding a Cap to the Retaining Wall
Retaining wall blocks are often finished with special cap stones, which are secured with concrete adhesive. However, timber and natural stone walls typically do not require a cap treatment.
Step 10: Completing the Drainage System
Stop adding gravel about 10 to 12 inches below the top of the wall. Pull the landscape fabric over the top of the gravel to cover it, cutting off any excess fabric. Place slow-draining topsoil on top of the fabric, making sure it is level with the top of the wall to prevent water pooling behind the blocks or timber. Compact the soil and add more as needed. To cover a grassy area above the wall, you can also lay sod or plant grass seed.
