

Quck answer
Transplanting a shrub can be done in a few simple steps. First, choose the right time to transplant, which is usually during the dormant season. Prepare the new location by digging a hole larger than the shrub’s root ball. Carefully dig around the shrub, ensuring you don’t damage the roots. Lift the shrub out of the ground and place it in the new hole. Fill the hole with soil, making sure to eliminate air pockets. Water the shrub thoroughly and add mulch around the base. Finally, monitor the shrub’s progress and provide proper care to help it establish in its new location.
Do you have a bush that is not thriving in its current spot and you believe it would do better somewhere else with different conditions? Or maybe your flower garden is overcrowding one of your bushes? Perhaps you simply don’t like where the plant is currently placed and want to relocate it. Here is a guide on how to transplant a shrub.
First, Tips for a Successful Transplant
Transplanting a shrub can damage its roots and shock the plant. Therefore, it is best to transplant under conditions and at a time that will cause the least stress.
- Most bushes have a higher chance of success if transplanted in spring or early summer when the plant is dormant, new growth has hardened off, and there are no light-green leaves present.
- Transplanting in cooler temperatures is better than in hot weather, and providing shade to the shrub during the process, if possible, is recommended.
- Prior to transplanting, ensure that the new location meets the optimal conditions for the plant, including light, exposure, soil pH, and drainage.
- Smaller shrubs have a higher success rate in transplantation compared to older, larger ones.
- Deciduous plants generally transplant better than evergreens.
- When digging up the shrub, aim for a root ball that is about two-thirds the diameter of the spread of the shrub. For example, for a 24-inch tall bush, dig a root ball that is 16 inches in diameter.
Preparation in Advance
You can increase the chances of successful transplantation by properly pruning the branches and roots starting about six months before the planned move.
Pruning the Branches
Six months before transplanting, prune the foliage by trimming the outermost ends of the main branches until side branches begin to grow. This reduces the amount of foliage that the plant will need to supply nutrients to later when it is transplanted, allowing it to allocate more energy to root development.
Pruning the Roots
The roots of shrubs primarily grow in the top 8 inches of soil and spread out in a diameter about 1.5 times the spread of the bush. At the ends of these roots are feeder roots or root hairs, which absorb nutrients and moisture. Unless you stimulate the growth of a large number of feeder roots near the trunk or stem before transplantation, most of the feeder roots will be removed when digging up the root ball, leaving the shrub with only thick, old roots that have limited absorption capacity. To promote the growth of feeder roots near the stem and retain more roots during transplantation, root-prune the shrub three to six months before moving it.
There are two methods for root pruning, depending on the age of the plant. For younger shrubs, use a technique called spading, which involves cutting the roots by thrusting a shovel into the ground in a circle approximately 6 inches inside the eventual root ball that will be dug out. For plants that have been in the same location for several years or more, use a method called trenching. Dig a trench 8 to 12 inches wide and 12 inches deep around the plant, with the outer edge of the trench along the line of the future root ball. Fill the trench with a mixture of two parts topsoil to one part compost. After root pruning, regularly check the base of the shrub to ensure the soil remains moist until transplantation.
Transplanting can have an impact on the shrub’s flowering in the following year. While the shrub may have fewer buds and berries, it should return to its normal state the year after.
Materials Needed
-
Garden hose for watering
-
Spray paint in a color that is visible on green grass
-
Tape measure
-
Approximately 10 feet of cord or lightweight rope
-
Shovel
-
Transplanting spade
-
Tarp (optional)
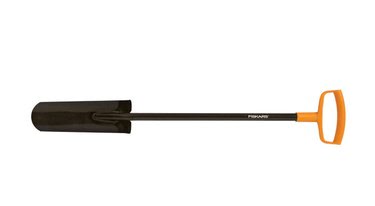
A transplanting spade has a longer blade than a regular shovel to reach under the shrub’s roots.
Image Credit:
Fiskars
Step 1: Prepare the Shrub
To minimize stress on the shrub, ensure it is well hydrated and protect branches from damage during the move.
- Water the base of the shrub deeply and thoroughly two days before transplanting to ensure the soil clings to the roots when you dig. Make sure the soil is moist up to a depth of 6 inches.
- Tie up the bottom branches of the shrub on moving day to keep them out of the way during digging and moving. Similar to how a Christmas tree’s branches are wrapped when purchased, wrap the shrub’s branches upward with cord without wrapping it completely like a mummy.
Step 2: Dig the Receiving Hole
To prevent the shrub’s root ball from being exposed for too long and drying out, start by digging the receiving hole.
- Mark the placement of the hole by spray-painting a circle on the grass that is twice the planned diameter of the root ball.
- Dig a hole 9 or 10 inches deep; you can adjust the depth later if necessary, but planting the shrub deeper than its original depth will harm it. Ensure the sides of the receiving hole are straight and not sloping inward.
- Water the hole to prevent the surrounding soil from absorbing water from the shrub’s root ball later on.
Step 3: Trench around the Shrub
Precise digging is crucial for the upcoming move of your shrub.
- Use the shovel to trace a circle in the soil beneath the shrub that is 14 to 16 inches in diameter. Dig wide and deep to acquire as many roots as possible, as more roots increase the chance of success.
- Dig along this line as deeply as possible, with the shovel facing outward and away from the shrub. Shoveling outward cuts the roots, whereas shoveling inward towards the bush will lift and break the roots, causing more stress to the plant.
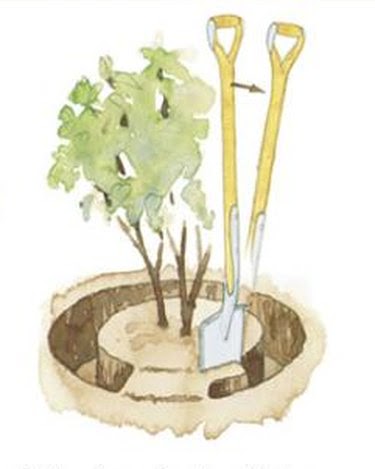
Dig the trench by shoveling away from the shrub.
Image Credit:
Fine Gardening
Step 4: Remove the Shrub
Once you have dug the trench, you will use the transplanting shovel to actually remove the shrub from its current location.
- To uproot the shrub, position the transplanting shovel at an angle beneath the plant and drive it deep into the trench line, approximately 8 to 15 inches. Repeat this process along the entire trench. The objective is not to remove dirt, but rather to sever the roots and detach the shrub from the ground.
- Carefully tilt the shrub, ensuring that the entire root ball is lifted from the ground. Do not shake off any soil, as this can damage the root system, even though it would make the shrub easier to move.
- Place the shrub in a wheelbarrow. Alternatively, if the shrub and its root ball are too large to be carried, lay a tarp underneath the shrub and drag it to its new location instead.
A shrub and its root ball in a wheelbarrow.
Image Credit:
Photo by Daniel Wachenheim
Step 5: Transfer the Shrub to the New Hole
Act swiftly when relocating your shrub to its new spot. The less time the roots are exposed to the air, the lower the risk of them drying out.
- Determine the height of the root ball. If it exceeds 9 or 10 inches, adjust the depth of the receiving hole accordingly. Then, carry or drag the shrub to the receiving hole (you may need assistance) and center it within the cavity.
- Fill the receiving hole with soil to cover the root ball. Do not add any amendments or fertilizer to the soil. Firmly tamp down the dirt, but avoid applying excessive force to prevent root damage.
- If desired, spread a layer of mulch that is 3 to 4 inches deep, making sure to keep it away from the stem.
- Thoroughly water the shrub at the roots immediately.
- Water the shrub daily for a week, ensuring that the soil remains moist but not overly saturated. Afterward, water every other day throughout the summer months.
- During its first year in the new location, refrain from pruning the shrub, except when removing broken branches, and do not fertilize it.
