
Quck answer
To test and replace the TPR (Temperature and Pressure Relief) valve on your water heater, follow these steps:
1. Turn off the power and gas supply to the water heater.
2. Locate the TPR valve on the top or side of the water heater tank.
3. Place a bucket or container under the valve to catch any water that may be released during testing or replacement.
4. Test the TPR valve by lifting the lever or turning the test knob. You should hear a rush of water and see it flowing into the bucket.
5. If the TPR valve doesn’t release water or is leaking continuously, it needs to be replaced.
6. To replace the TPR valve, turn off the water supply to the water heater and drain some water from the tank.
7. Unscrew the old TPR valve and install the new one, making sure to use Teflon tape on the threads for a secure seal.
8. Turn the water supply back on and check for any leaks.
9. Turn on the power and gas supply to the water heater.
Remember, proper maintenance and regular testing of the TPR valve is essential to ensure the safety and efficiency of your water heater.
The TPR valve, also known as the temperature pressure relief valve, is a safety feature installed on water heaters to prevent excessive pressure buildup and potential explosions. If you’re unsure whether your water heater has one, don’t worry – if it has a tank (as opposed to being tankless), it definitely has a TPR valve.
The TPR valve is a brass fitting that is usually located on the top or side of the tank. It resembles a spigot with a 3/4-inch male threaded inlet and a 3/4-inch male or female threaded outlet. Instead of a handle, it has a lever that is spring-loaded. When properly installed, it should have a discharge pipe that extends a few inches above the floor.
Since the purpose of the TPR valve is to release excessive pressure, it is often not active. It is made of brass, so it doesn’t corrode, but it can accumulate scale on the lever mechanism. When there is enough scale buildup to prevent the lever from closing completely, the TPR valve may leak even when the tank pressure is within a safe range. This is a sign that the valve needs to be replaced. Another crucial reason to replace it is when it fails to open when it should.
The Importance of a Working TPR Valve
If the TPR valve is leaking and causing water to continuously drip onto the floor, it can create a mess and increase humidity in the water heater room. However, if the valve is stuck in the closed position due to scale and mineral deposits, it fails to fulfill its purpose of opening and releasing excess pressure. This can have catastrophic consequences.
As the water in the tank heats up, it expands. If there is no outlet for the expanding water, it puts pressure on the tank liner, eventually causing it to leak. In a worst-case scenario, if the thermostat malfunctions and the water heater temperature rises beyond the safe limit of 120-140 degrees Fahrenheit, the tank can explode, resulting in flooding and potential injuries.
When the expanding water backs up into the cold water supply pipe that extends into the tank, a path back to the water source is created, reducing the risk of an explosion. However, some homes have a check valve on the main water valve that prevents backflow, creating a closed system where pressure can dangerously build up. In such systems, a functioning TPR valve is crucial, and an expansion tank should also be installed on the cold water supply line.
How to Test a Water Heater TPR Valve
Homeowners should test their water heater TPR valve every six months. The process is simple and involves manually opening the valve. It is recommended to conduct the test on a day when hardware stores are open, ensuring that a replacement valve can be easily obtained if needed.
Before conducting a valve test, ensure that a discharge tube made of a corrosion-resistant material, such as copper, PVC, or CPVC, is properly connected and forms a drain line that extends downwards towards the floor. If there is no pan or bucket on the floor already (which there should be), place one underneath the discharge tube opening to catch any water. Partially lift the lever on the valve, allowing enough space for water and steam to escape. Avoid fully opening the lever as it may become stuck in the open position.
You should hear water bubbling into the discharge tube and observe it pouring out from the end of the tube. If no water is coming from the valve, it indicates a blockage and immediate replacement is necessary. If water continues to flow from the valve after releasing the lever, lift the lever again and let it fall a few more times. If needed, lightly tap the valve. If unable to close it, replace the valve.
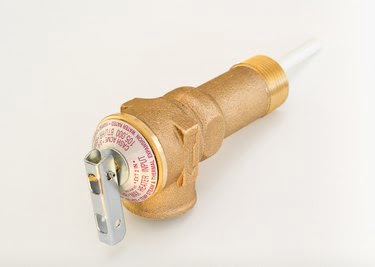
Image Credit:
Kevin Brine/iStock/GettyImages
Items Required
-
Plumbing tape
-
Copper or PVC coupling
-
Garden hose
-
Pipe wrench
-
Hacksaw
-
Small, stiff brush
How to Replace a TPR Valve for a Water Heater
The power supply to the water heater must be turned off when replacing the TPR valve. It is not necessary to wait for the water in the tank to completely cool down, but it is advisable to allow some time for it to cool to avoid scalding.
Step 1: Switch Off the Power to the Water Heater
If you have an electric water heater, switch off the corresponding circuit breaker in the main panel. For gas water heaters, turn off the valve in the gas supply line and then shut off the gas valve on the water heater.
Step 2: Turn Off the Water and Release Pressure
Locate the valve for the cold water supply to the water heater and turn it off. Open a hot water faucet somewhere in the house to release pressure from the hot water line. Keep the faucet open.
Step 3: Partially Drain the Tank
Attach a garden hose to the drain valve at the bottom of the tank and direct the hose towards a floor drain, utility sink, or outdoors. Open the drain valve and allow enough water to drain so that the level in the tank is below the TPR valve. You will know that enough water has been drained when opening the valve results in no water coming out.
Step 4: Remove the Discharge Tube
Using a pipe wrench, unscrew the discharge tube from the TPR valve. If the valve is located on the top of the tank, the discharge tube may have an elbow joint. In this case, since the elbow is often soldered or glued, it is necessary to cut the pipe just before the elbow using a hacksaw.
Step 5: Unscrew the TPR Valve
Turn the TPR valve counterclockwise using the pipe wrench. Once it is loose enough, continue turning it by hand until it can be removed. Clean the threads of the opening in the water heater using a small, stiff brush.
Step 6: Installation of the New Valve
Take the plumbing tape and wrap it clockwise around the threads of the new TPR valve. Usually, three turns are enough, but make sure to leave about 1/4 inch of the threads exposed at the bottom to prevent excess tape from getting into the tank. Now, screw the valve into the valve opening and use a pipe wrench to tighten it.
Step 7: Replacement of the Discharge Tube
Attach the discharge tube to the new valve. In case you had to cut the tube, fix the cut by either gluing or soldering a PVC or copper coupling.
Step 8: Tank Refill and Power Restoration
Open the cold water valve and let the tank refill. You’ll know that the tank is full when the air stops sputtering from the faucet that you had left open and the water flows in a continuous stream. Once this happens, close the faucet. For an electric water heater, restore power by turning the breaker back on. If you have a gas water heater, turn on the gas and relight the pilot following the instructions provided in your owner’s manual.
