

Quck answer
To test an electric hot water heater thermostat, follow these steps:
1. Turn off the power to the water heater at the breaker box.
2. Remove the access panel on the side of the water heater.
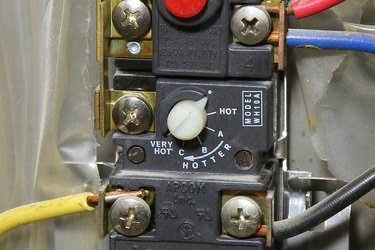
3. Locate the thermostat, which is typically a small box with temperature settings.
4. Use a multimeter to test the thermostat for continuity. Set the multimeter to the ohms setting and touch the probes to the terminals on the thermostat. If there is no continuity, the thermostat is faulty and needs to be replaced.
5. If the thermostat passes the continuity test, turn the power back on and set the temperature to a higher setting.
6. Wait for the water heater to heat up and check if it shuts off at the desired temperature. If it doesn’t, the thermostat may need calibration or replacement.
Testing the thermostat is important to ensure that your hot water heater is functioning properly and providing hot water at the desired temperature.
An electric hot water heater consists of two thermostats that control two separate heating elements. One thermostat is located in the upper half of the tank, while the other is in the lower half. Typically, if the upper thermostat is faulty, there will be no hot water at all. On the other hand, if the lower thermostat is faulty, there will only be a small amount of hot water before the tap water turns cold. However, this is not always the case, so it’s important to test both thermostats to identify the faulty one.
To test the thermostats, you will need a multimeter, which is a common tool used by electricians. Once you have identified the faulty thermostat, you can replace it and restore your hot water supply.
Step 1

First, turn off the water heater circuit breaker in the main service panel.
Step 2

Next, use a Phillips screwdriver to remove the upper and lower access panels. These panels are usually located on the side of the electric hot water heater and may have an electrical warning label attached.
Step 3

Remove any insulation covering the thermostat and heating element. Take care not to disturb any wires while doing this.
Step 4

Using a flat-head screwdriver, adjust the temperature setting on the upper thermostat to the highest level. Set the multimeter to the RX1 setting.
Step 5
Place one probe on the left screw terminal with the white wire, and the other probe on the terminal directly above it. The multimeter should display a reading of zero. Any other reading indicates a faulty thermostat.
Step 6
Now, set the upper thermostat to the lowest setting using the flat-head screwdriver. You should hear a click from the thermostat during this process. Place one probe on the terminal above the white wire, and the other probe on the terminal where the black wire is connected. Once again, the multimeter should show a reading of zero.
Step 7

With the upper thermostat still set to the lowest setting, test the lower thermostat. Use the screwdriver to set the lower thermostat to the highest level. Touch one probe of the multimeter to each terminal on the lower thermostat. The lower thermostat only has two terminals, and the multimeter should display a reading of zero.
Step 8

Replace the faulty thermostat and reposition the insulation over the thermostats and heating elements. Secure the access panel covers with the retaining screws. Finally, turn the circuit breaker back on to activate the electric water heater.
