

Quck answer
Push-fit plumbing fittings are a convenient and easy-to-use option for plumbing projects. Here are some key steps to work with push-fit fittings:
1. Prepare the pipe: Cut the pipe to the desired length, ensuring a clean and square cut. Remove any burrs or rough edges.
2. Mark the insertion depth: Use a depth marker to identify the correct insertion depth on the pipe. This ensures a proper and secure fit.
3. Lubricate the fitting: Apply a small amount of lubricant to the end of the fitting and the inside of the pipe. This helps the fitting slide smoothly into place.
4. Insert the pipe: Push the pipe into the fitting until it reaches the marked insertion depth. Give it a slight twist to ensure a tight connection.
5. Check for leaks: Turn on the water supply and inspect the connection for any leaks. If there are any leaks, tighten the fitting or reinsert the pipe.
Remember, push-fit fittings are not suitable for all plumbing applications. Consult a professional if you are unsure about using them for specific projects.
Using a push-fit plumbing fitting is as simple as putting a cap on a pen. After cutting, cleaning, and marking the pipe for fitting depth, all you need to do is push the fitting onto the pipe for a secure yet detachable connection. It’s easy and almost foolproof. To ensure a leak-free connection, make sure the pipe end is cut straight, clean, and smooth on the outside, and push the fitting (or push the pipe) as far as it can go.
Push-fit plumbing fittings make connecting two pipes very easy.
Image Credit:
SharkBite
Basics of Push-Fit Plumbing Fittings
Push-fit fittings, also known as push-on, push-to-connect, or push fittings, are primarily designed for use with rigid copper, CPVC (chlorinated polyvinyl chloride), and PEX (cross-linked polyethylene) water pipes. There are also small fittings available for polyethylene and other types of plastic tubing, used for water filters, ice makers, and aquariums. Push-fit fittings cannot be used with galvanized steel pipes and most types are not compatible with flexible (soft) copper tubing.
There is a push-fit plumbing fitting available for every type of water supply fitting found in a house, including elbows, tees, unions, shutoff valves, hose bibs, repair couplings, and even hookup hoses for hot water heaters. Most plumbing codes allow push-fit fittings to be installed inside wall and ceiling cavities, and some fittings can even be buried underground (after being wrapped in protective tape). If you are planning to use push-fit fittings for a large project (which can be costly as these fittings are not cheap), check with the local building department for any usage restrictions.
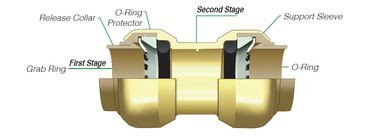
Push-fit plumbing fittings secure the pipe with a ring of stainless steel teeth inside the fitting, while one or more O-rings inside the fitting create a watertight seal around the pipe. If the pipe is not perfectly round or has rough edges or debris on its surface, the O-rings may not create a perfect seal, resulting in leaks. Similarly, if the pipe is not cut straight, it may not push into the fitting evenly or extend the required distance for a proper seal. This is why it is recommended to cut the pipe using a tubing cutter rather than a saw.
Items You Will Need
-
Tubing cutter
-
Deburring depth-gauge tool
-
Emery cloth (optional)
-
Utility knife (optional)
-
Rag
-
Marker
-
Push-fit plumbing fitting
-
Push-fit fitting removal tool (if necessary)
How to Install a Push-Fit Plumbing Fitting
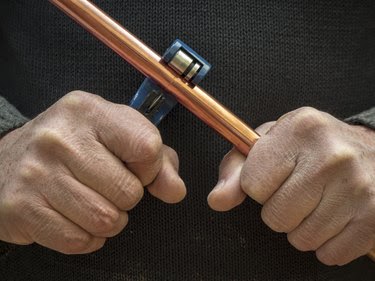
Cut copper pipe with a tubing cutter
Image Credit:
macida/iStock/GettyImages
Step 1: Cut the Pipe
Using the appropriate tubing cutter for the pipe material, cut the pipe as needed: use a copper tubing cutter for copper, a plastic tubing cutter for CPVC, and a PEX cutter for PEX. When measuring for the cut, remember that the pipe will extend approximately 1 inch into the fitting.
Step 2: Prepare and Smooth the Pipe
To prepare the cut end of the copper pipe, use a reaming-deburring tool to remove the sharp and jagged edge left by the tubing cutter. This tool reams the inside of the pipe and deburrs the outside edge simultaneously.
Alternatively, you can use the reamer tool on the backside of a tubing cutter to ream the pipe, and then use fine-grit emery cloth or sandpaper to smooth the outside edge. Only sand the edge and not the side wall of the pipe.
CPVC pipe and PEX tubing do not require reaming or deburring. However, if there is a ridge on the inner edge of CPVC pipe, you can carefully ream it using a utility knife or fine sandpaper or emery cloth.
Make sure to remove any debris from inside the pipe and clean the outside of the pipe with a rag.
Tip
Some manufacturers of push-fit fittings offer multi-size deburring-depth gauge tools that ream and deburr the pipe. These tools also serve as marking gauges for indicating the depth of the fitting.
Step 3: Mark the Pipe
Use a deburring-depth gauge tool and a marker to mark the pipe, indicating the full depth of the fitting. Slide the tool onto the end of the pipe until it stops, and then mark a line along the edge of the tool.
If you don’t have a depth gauge tool, you can measure from the end of the pipe using a tape measure and mark the pipe at the specified depth recommended by the manufacturer for the fitting.
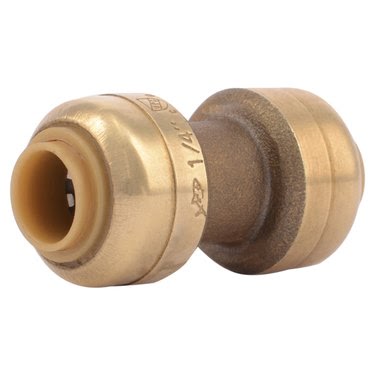
Push-fit unions securely hold pipes without the need for solvents or compression fittings.
Image Credit:
Shark Bite
Step 4: Install the Fitting
Insert the fitting straight onto the end of the pipe (or push the pipe straight into the fitting, if applicable) until the pipe is fully seated inside the fitting. The end of the fitting should align with the depth mark on the pipe, indicating a proper installation.
After installing the fitting, you can rotate the pipe or fitting up to 360 degrees in either direction to facilitate the next step in your plumbing installation.
Note: Most push-fit fittings come with a bushing or PEX stiffener inside to stabilize the end of PEX tubing. However, for certain fittings, you may need to add a separate bushing before installation. If you are using copper or CPVC pipe, you do not need to remove the built-in bushings.
Tip
Use a push-fit fitting removal tool to remove a pipe or fitting at any time after installation. This tool is a small, plastic horseshoe-shaped clip that fits over the pipe. Press the tool against the release collar (where the pipe meets the fitting), and then pull out the pipe. Some fittings can be reused after removal, while others are designed for single-use only. If you remove a fitting from PEX tubing, make a fresh cut on the tubing (at least 1 inch from the end) before re-installing the push-fit fitting.
