
Quck answer
Knob and tube electrical wiring was commonly used in homes built before the 1950s. However, it is considered outdated and unsafe by modern standards. If you have knob and tube wiring in your home and want to remove it safely, here are the steps to follow:
1. Consult a licensed electrician to assess the condition of the wiring and determine if it needs to be replaced.
2. Create a detailed plan for the removal process, including a timeline and budget.
3. Turn off the power to the affected areas and use appropriate safety equipment, such as gloves and goggles.
4. Carefully remove the knob and tube wiring, making sure not to damage any surrounding structures or other electrical components.
5. Replace the wiring with modern, safer alternatives, such as armored cable or non-metallic sheathed cable.
6. Have the new wiring inspected by a qualified electrician to ensure it meets all safety codes and regulations.
By following these steps and seeking professional guidance, you can safely remove knob and tube electrical wiring from your home.
Knob and Tube wiring (K&T) is an outdated method of electrical distribution that was used in homes until the 1930s. It was considered innovative at the time because it kept the hot and neutral wires separate, reducing the risk of short-circuits. The “knobs” were porcelain fixtures that supported the wires along the ceiling or walls, while the “tubes” protected the wires as they ran through joists or studs. Even if your home still has active K&T wiring, it is recommended to remove it and upgrade to more modern electrical methods.
Step 1
When working with electrical tasks, always start by turning off the circuit breakers. If your knob and tube wiring is still connected to the breakers, use a screwdriver to disconnect the feed wires and neutral wires. Once disconnected, remove the wires from the panel box.
Step 2
Use a voltage tester to check if the wire is still carrying voltage. A tester with both audio and visual indicators is the most convenient. Press the button on the tester and hold it against the wire. If the light doesn’t stay on and the tester doesn’t beep, then the wire is not live.
Step 3
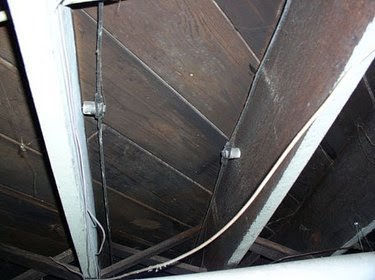
Knobs holding long lengths of wire
Starting from the electric panel, cut out the old wiring using linesman pliers or wire cutters. When you encounter a knob, cut the wire on both sides of it.
Step 4
At this point, you can choose to remove the knobs or wrap them tightly with electrical tape. To remove them, use a hammer to pry them off the wooden boards or a screwdriver to unscrew them. Be cautious as the porcelain knobs can break if subjected to too much force.
Step 5

Tubes protecting wires running through a joist
When you come across a tube, pull the cut end of the wire through it. If desired, you can leave empty tubes in the stud or beam, or remove them.
Step 6
If you are not conducting a complete electrical renovation, your wire removal will likely involve everything from the electrical panel to where the wire passes through the floorboards. In this case, never connect a live wire to the old knob and tube wiring that remains within the walls. If your walls are open, follow these wire removal instructions for the rest of the home.
