Quck answer
To paint a radiator, follow these steps:
1. Turn off the radiator and let it cool completely.
2. Clean the surface of the radiator using a damp cloth and mild detergent.
3. Sand the surface lightly to remove any existing paint or rust.
4. Apply a primer designed for metal surfaces to ensure good adhesion.
5. Once the primer is dry, apply a thin coat of radiator paint using a brush or roller.
6. Allow the paint to dry completely before applying a second coat if needed.
7. Reinstall the radiator and turn it on only after the paint has fully cured.
Remember to choose a paint that is heat-resistant and suitable for radiators.
Painting your home’s radiators is a cost-effective way to update their appearance and ensure they match the room’s color scheme after a remodel. It’s best to paint a radiator during a warm month when the heat is off and the windows can be opened. If that’s not possible, make sure to turn off the heat and let the radiators cool before painting to ensure the paint adheres properly.
Pre-Painting Preparation

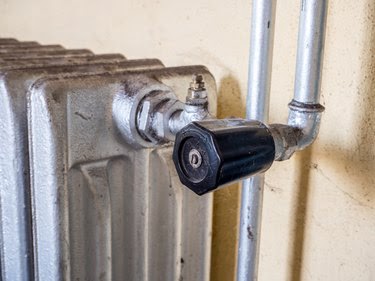
To prevent the paint from clogging or sealing the valves and movable parts, cover them with masking tape. It’s important to clean the radiator and remove any rust or chipping paint before painting, regardless of whether you’re using a brush or spray. Use a damp rag or paper towels to wipe down the cool radiator and remove dust. Place a drop cloth beneath and around the area, and cover any nearby cold-air returns on the floor if your home has them.
If the radiator has chipping lead-free paint or rust spots, use steel wool or a wire-bristled brush to go over them while wearing a dust mask. Then, wipe the radiator with a tack cloth or slightly damp paper towel. Shake the drop cloth outdoors to remove debris and place it back on the floor beneath and around the radiator.
Warning
If you suspect that the old paint on your radiator is from 1977 or earlier, it may contain lead, which can be harmful, especially to children. Test the paint with a lead test kit from a hardware store. If it’s positive for lead, do not sand or scrape it. If the radiator is nonfunctional, you can use a lead-encapsulating primer to cover the lead. However, if the radiator heats to above 240 degrees Fahrenheit, most encapsulants won’t work. In that case, contact a local lead-encapsulating company or a heating and cooling firm that handles radiators to find a way to seal off the lead.
Once the radiator is ready for painting, use sheets of newspaper and paper towels to mask off areas you don’t want to paint. Also, tape off the radiator valves. Make sure to fully cover the area immediately beneath the radiator, as paint tends to drip there. If you plan to spray paint, cover the walls and baseboards behind and alongside the radiator with a sheet of cardboard or newspaper.
How to Spray-Paint a Radiator

The type of spray paint and primer you need for a radiator depends on the radiator itself. If it’s still functioning as a heat source, choose a high-heat enamel primer and high-heat enamel paint. If it’s no longer functional, any rust-blocking, durable primer and paint designed for metal will work.
Things You’ll Need
-
Window fan (optional)
-
High-heat enamel spray primer for metal
-
Dust mask
-
Disposable gloves
-
You will need high-heat enamel spray paint in the color of your choice
-
A bright work light is optional
Step 1
To ventilate the room, open the windows. If desired, you can also use a window fan to draw air out. This will help minimize the smell of paint and primer, although it is not necessary.
Step 2
Shake the can of spray primer for about a minute, as instructed on the label. Put on a dust mask and disposable gloves, and then remove the lid from the primer can.
Step 3
Spray the radiator using gentle sweeping motions horizontally. Hold the can about 10 to 14 inches away from the radiator. Start each sweep just before one end of the radiator and end it just after the opposite end to ensure full coverage. Make sure to protect the walls from overspray.
Step 4
Continue priming until the entire radiator is covered. Check the radiator from the sides and top-down view, and spray any areas that may be visible along the back and sides. Be careful not to spray towards the room or onto yourself if the radiator is in a hard-to-reach corner.
Step 5
Allow the primer to dry completely before painting. The drying time varies depending on the product, room temperature, and humidity level. It may take up to 24 hours.
Step 6
Once the primer is fully dry, you can start painting the radiator. Shake the paint can as instructed on the label, put on your dust mask and gloves, and then spray the radiator using the same technique as the primer. Apply thin layers of paint that slightly overlap instead of one thick coat to avoid dripping.
Step 7
Apply a second and even a third coat of spray paint, allowing each coat to dry for 5 to 10 minutes, or as recommended on the label. Let the final coat cure completely, following the instructions on the label, before turning on the heat.
How to Paint a Radiator with a Brush

Choose a paint color for the radiator that matches the room.
Image Credit:
Gladiathor/iStock/GettyImages
Using a brush to paint a radiator gives you more control and eliminates the risk of overspray. However, it may be more challenging to reach the innermost exposed areas between the radiator parts. Just like with spray painting, you will need a high-heat primer and enamel paint for a radiator that is still in use. For non-functioning radiators, you can use other durable interior primers and paints, or an all-in-one primer and paint designed for metal.
Things You’ll Need
-
High-heat brush-on primer
-
Paint stir stick
-
Paint tray or disposable bowl
-
Disposable gloves (if desired)
-
Paint brushes from 1 to 2 inches wide
-
High-heat brush-on paint
Step 1
Open the can of primer and stir it with a stir stick until the liquid has a consistent color and texture.
Step 2
Place the paint tray or bowl on the drop cloth near the radiator. Pour some of the primer into the tray or bowl, and then put the lid back on the primer container.
Step 3
Start by applying the primer to the radiator. Begin from the top and work your way down, starting from the corner that is the most difficult to reach. Then move towards the center and finally cover the other edge of the radiator face. For larger areas, use a 2-inch brush, and for pipes or recessed areas, use a smaller brush like a 1-inch size.
Step 4
If needed, apply a second coat after the first one has dried. The drying time will vary depending on the product, so make sure to check the label for specific instructions. Once the radiator has been completely covered, allow the paint to cure according to the instructions on the label before turning on the heat.
Tip
A painter’s mitt can be useful for reaching areas that are deeply recessed, which is common in many old radiators. To use it, wear the mitt on your painting hand, dip the front part of the mitt’s “fingers” into the paint, and then rub the paint onto the recessed areas of the radiator.


