
Quck answer
Spray foam insulation can be removed using a few different methods. One option is to hire a professional insulation contractor who has the necessary equipment and expertise to safely remove the foam. Another option is to use a combination of scraping and sanding to remove the foam manually. This method can be time-consuming and may require some effort, but it is possible to remove the foam this way. It’s important to note that removing spray foam insulation can be difficult and may damage the underlying surfaces, so it’s best to consult with a professional before attempting to remove it yourself.
Taking off spray foam insulation can be a challenging task that many people dread. It is a stubborn substance that doesn’t offer many options for removal. When it comes to clothes and skin, it is best to act quickly before it dries, as it becomes much harder to remove once it hardens. However, the opposite is true when removing it from common building materials.
How to Get Rid of Spray Foam Insulation
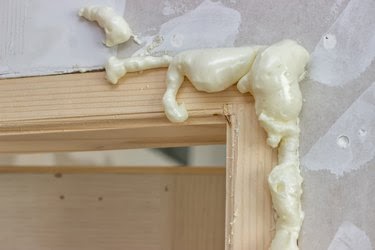
Image Credit:
eyjafjallajokull/iStock/GettyImages
Removing from Construction Materials
The first step in removing spray foam insulation is to wear a mask. It is important to cover the nose and mouth at all times due to dust residue. Before starting the removal process, ensure that the foam insulation is completely dry to make it easier to remove.
Begin by cutting out pieces of the insulation using a knife, saw, or even a flat pry bar and hammer. Use any of these tools to remove as much insulation as possible, while being cautious of any hidden wiring within the spray foam. The remaining spray foam insulation should be scratched with a hard bristle brush or a paint scraper to get as close to the wood, concrete, or brick surface as possible.
Finally, to remove any remaining traces of spray foam insulation, apply lacquer thinner to the foam and wipe it away with a rag once the foam has loosened its grip on the material. Avoid using water to remove spray foam insulation, as it has the opposite effect and causes the foam to harden instead of softening it.
Removing from Clothing
The best time to remove spray foam insulation from clothing is when it is still wet and hasn’t had a chance to set. Rub the affected clothing with a dry rag that can be discarded later, and remove all insulation that has come into contact with the fabric. The next step is crucial in removing all traces of foam from the clothing. Dampen a rag with acetone, which can be found in nail polish remover, and blot it on the areas where the insulation was in contact with the fabric. Follow this with a treatment of clothing stain remover and wash the clothes according to the instructions on the stain remover bottle.
If the spray foam insulation has hardened and is difficult to wipe off, try breaking it off in chunks and then continue with the acetone-blotting step mentioned above. This is a more challenging alternative that can be avoided by wearing a disposable jumpsuit over your clothing or using old clothes that can be thrown away when working with spray foam insulation.
Removing from Skin
The most common area of skin affected by spray foam insulation is the hands. Similar to clothing, it is easiest to deal with the foam when it is still wet. The process is quite similar to removing it from clothing, with the addition of taking care of your hands since they may be affected by the insulation.
To start, clean the skin by wiping it with a cloth and getting rid of all the damp foam. Then, dampen another cloth with acetone and rub it all over the skin, ensuring that no areas of affected skin are missed. This will eliminate all the insulation. Finally, apply lotion generously to your hands to keep them moisturized and hydrated.
If the foam has hardened, removing it from the skin becomes more challenging and frustrating. Take a pumice stone and use it to scrub the areas with dried foam until there is no trace of insulation left. Treat the affected areas with petroleum jelly and cover your hands with gloves long enough for the jelly to soak in and nourish the skin. After about 60 minutes, remove the gloves and wash your hands with soap and water. This treatment will revive your hands and prepare them for another DIY project in no time.
