
Quck answer
To adjust Grohe shower faucets, follow these steps:
1. Start by turning off the water supply to the shower.
2. Remove the handle of the faucet by unscrewing it or using a screwdriver.
3. Locate the temperature adjustment knob or valve.
4. Turn the knob or valve clockwise to increase the temperature and counterclockwise to decrease it.
5. Test the water temperature by turning on the shower and adjusting the knob as needed.
6. Once you’re satisfied with the temperature, reassemble the faucet handle.
7. Turn on the water supply and check for any leaks.
Remember to handle the faucet with care and consult the manufacturer’s instructions for specific guidance on your model.
Some Grohe shower faucets have anti-scald technology, which is also called a shower thermostat or a thermostatic mixer. These special shower valves not only limit the maximum water temperature that comes out of the showerhead, but also help to keep the shower water at a consistent temperature. This prevents you from being surprised by a sudden burst of hot or cold water when someone else turns on a faucet or the dishwasher starts.
Thermostatic valves need to be adjusted during installation for the best results. Fortunately, Grohe has made its anti-scald shower faucets user-friendly for easy adjustments after installation as well. You will need a thermometer and possibly a flat-head screwdriver.
Adjusting GrohTherm 1000 Grohe Faucet
Visit Page
https://www.amazon.com
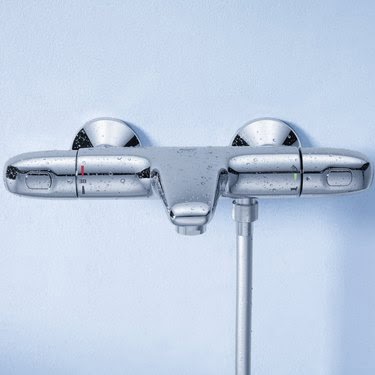
Image Credit:
Amazon
Grohe’s thermostatic mixer shower faucets come in several different styles. One option, like the GrohTherm 1000, is shaped like a horizontal bar or cylinder. Turning one handle towards you will increase the temperature, while the other handle controls the water volume. To start the adjustment process, turn the temperature handle so that the “38 degrees” label lines up with the dot on the other side.
Then turn the water on and make sure the diverter is pushed down so that water flows through the faucet (remove the showerhead attachment if your model does not have a diverter). Allow the tip of the thermometer to sit in the stream of water until the line stops moving, being careful not to get your hands wet in case the water is too hot. If the thermometer shows that the water is hotter than 38 degrees Celsius (or hotter than your desired temperature), you will need to adjust the thermostatic valve.
To access the adjustment mechanism, remove the end cap from the temperature handle and unscrew the screw using a flat-head screwdriver. Then remove the decorative handle cover. Turn the water on again and keep the thermometer in the stream of water. Slowly rotate the black adjustment knob away from you until you are satisfied with the temperature, and then put the faucet cap back on.
Adjusting GrohTherm SmartControl Thermostatic Valve
Visit Page
https://www.amazon.com
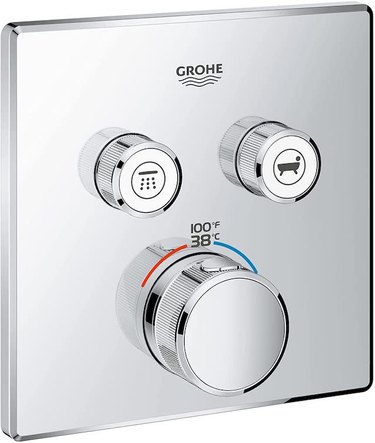
Image Credit:
Amazon
Many of Grohe’s faucet trim sets have the GrohTherm SmartControl design, which includes a series of push-button diverters and pressure valves, as well as a large central knob that controls the water temperature. If you are in the process of installing one of these styles, you can adjust the temperature before any of the decorative knobs or escutcheons are in place. You can also easily adjust the temperature at any time after installation.
With only the cartridge in place, push in one of the diverter buttons to turn on the water. Hold the tip of the thermometer in the stream of water until the line stops moving. If the temperature reading is too hot, turn the bottom stem to the right. If it is too cold, turn it to the left.
With the trim already in place, rotate the temperature control to the left and remove the cap. Gently pull out the gray plastic adjuster, allowing it to manipulate the inner mechanism without affecting the outer knob. Switch on the water, check the temperature, and adjust the gray adjuster to the left for increased heat or to the right for decreased heat. Completely remove the adjuster, reposition it with the long, curved side at the top, and reinstall it by pushing it back in.
