

Quck answer
Caulking windows and doors is an essential task to ensure energy efficiency and prevent drafts. Here are the steps to caulk windows and doors:
1. Clean the area: Remove any old caulk and dirt using a scraper or putty knife. Clean the surface with soap and water, and let it dry completely.
2. Choose the right caulk: Select a caulk that is suitable for your specific needs, such as silicone or latex caulk.
3. Prepare the caulk gun: Cut the tip of the caulk tube at a 45-degree angle and load it into the caulk gun.
4. Apply the caulk: Hold the caulk gun at a 45-degree angle and apply a continuous bead of caulk along the seam or gap. Smooth the caulk with a caulk smoother or your finger.
5. Clean up: Remove any excess caulk with a damp cloth or sponge. Let the caulk dry completely before painting or exposing it to water.
By following these steps, you can effectively caulk your windows and doors, improving insulation and reducing energy costs.
The gaps around your door and window frames can result in significant expenses. They allow cold air to enter your home, making you feel cold even with well-insulated walls. To keep warm, you may have to turn up the heater, leading to a 20 percent increase in your energy bill. Additionally, if moisture enters through these cracks, it can damage the wall framing. Luckily, sealing these cracks with caulk is a simple solution. Although it may require working on a ladder, which can be dangerous, caulking around indoor window and door frames is even easier.
Caulking requires some skill, but it is a skill that the average person can quickly develop. To complete the job, you will need a caulking gun, a knife, a paint scraper, rags, and caulk. There are various types of caulk available, so it is important to research and choose the best one for your specific needs. Generally, silicone caulk is suitable for exterior use, while pure or siliconized latex is recommended for indoor use.
Gather the Necessary Supplies for Caulking Your Doors and Windows
It is best to have all the supplies you need before starting the caulking job to avoid interruptions. The amount of caulk needed depends on the width of the gaps you need to fill. Assuming the average gap is less than 1/2 inch wide, a single tube of caulk is sufficient for about three or four door or window frames. Since gap width can vary, coverage is not listed on the caulk label. However, the label provides all the other necessary information, such as color, material, setting time, mildew resistance, and recommended usage. If you are unsure of how much caulk you need, it is better to overestimate and return or save any unused caulk for future use.

All the information you need about a tube of caulk is listed on the label.
Image Credit:
Lowes
The quality of caulk guns can vary. Instead of opting for the cheapest option, it is worth spending $10 to $15 more to ensure a high-quality gun that minimizes mess. When choosing between a notched and smooth plunger, select the smooth one as it provides more pumping power. Additionally, the quick-release lever on a smooth plunger is more reliable than that on a notched plunger. While these guns are advertised as dripless, they only live up to this claim if you remember to push the lever. Better-quality guns also have a tip-cutting mechanism and a wire rod for piercing the tube seal, eliminating the need for a long nail.
After applying the caulk, it is important to smooth it out, a process known as tooling. You can use your finger for this, which is why having plenty of rags is necessary. Alternatively, you can use a spoon. If you are willing to spend a few extra dollars, you can also purchase a plastic tooling tool, although its effectiveness compared to using your finger is debatable.
Using your finger is the most effective tool for caulking.
Image Credit:
Mike’s Painting & Home Improvement, Inc.
Get Ready to Caulk Doors and Windows
Whether you’re working inside or outside, it’s important to remove any existing caulk before applying new caulk. If you don’t, the new caulk won’t create a proper seal and will fail quickly. Old latex caulk can usually be removed with a paint scraper, but silicone caulk is more challenging. There are products available that claim to soften or dissolve silicone to aid in removal, but often you’ll need to use a sharp knife to cut away a significant portion of the old caulk. It’s a tedious task, but necessary. Once you’re finished, clean up any loose debris with a damp cloth.

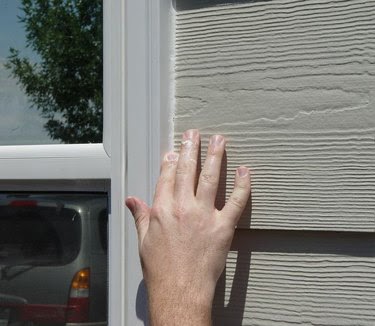
Cutting the tip at an angle helps guide the caulk into the gap.
Image Credit:
The Stucco Guy
If your caulk gun has a built-in cutter, simply insert the tip into the hole in the handle of the gun and pull the trigger. Otherwise, use a utility knife to cut the tip off the tube. It’s best to cut at a 45-degree angle about one-third of the way from the tip. This helps minimize mess: the size of the opening ensures the bead isn’t too large, and the angle ensures that all the material flows into the gap you’re filling. After cutting the tip, insert a nail or the rod on your caulking tube to break the seal. Then, insert the tube into the gun, pull the trigger a few times until the rod contacts the plunger at the bottom of the tube, and you’re ready to begin caulking.
Tips for Efficient Caulking
Once you become comfortable with caulking, you’ll find it to be a relatively easy task. In fact, the less effort you put in, the better the results. However, initially, you may need to get used to the rate at which the caulk exits the tube so you can adjust the speed at which you move the gun along the crack. This is why it’s a good idea to start in an inconspicuous area, such as the top of a door or window frame. Always draw the tip away from the area where you just applied caulk. Pushing into it will only result in unsightly and problematic build-up of excess material.
Whenever possible, apply a continuous bead from one end of the gap to the other in a single motion. Maintain steady pressure on the trigger to ensure a consistent flow of caulk. If you miss a spot or need to fill a larger gap, finish the bead and then go back to apply more where needed. Don’t forget to release the lever every time you finish a bead. It’s a good idea to wrap a cloth around the tip to catch any material that may fall out.
Take a tool and smooth out the caulk immediately after applying it. Use your finger or another tool of your choice to run over the fresh caulk in one continuous motion. Then, use a rag to remove any excess caulk from your finger or the tool. If you are using latex caulk, it is best to keep the rag damp. However, if you are applying silicone, butyl, or any other non-water soluble material, use a dry rag instead.
