

Quck answer
To make a pillowcase, you will need the following materials: fabric, thread, scissors, and a sewing machine or needle and thread.
1. Measure and cut the fabric to the desired size, usually 20 inches by 30 inches for a standard pillow.
2. Fold over and sew a small hem along one of the shorter edges.
3. Place the fabric right sides together, aligning the raw edges. Pin the sides and bottom.
4. Sew along the pinned edges, leaving the hemmed edge open.
5. Trim any excess fabric and clip the corners.
6. Turn the pillowcase right side out and press it flat.
7. Insert the pillow and fold the open hem over to close the pillowcase.
Now you have a homemade pillowcase ready to use or gift to someone!
If you have a desire to transform the world, start by making your bed.
That’s correct. According to Admiral William H. McRaven, who spoke to the 2014 graduating class of the University of Texas at Austin, accomplishing this simple task in the morning will set you up for success throughout the day. “The little things in life matter.” So let’s discuss how you can efficiently make your bed in style: Keep your bedding simple with a fitted sheet, duvet, and bed pillows. Now, let those pillows be the main focus in pillowcases that showcase your unique personality. With basic sewing skills and equipment, you can create your own pillowcase in no time. Just be careful: you might become addicted to making them. Before you know it, you’ll have a drawer full of pillowcases to switch out with the seasons, and they’ll become your favorite gift bag during the holidays.

The United States Navy SEALs would approve: square corners, tight covers, carefully placed pillows, and the extra blanket folded neatly at the foot of the bed.
Image Credit:
ExperienceInteriors/E+/GettyImages
Items Needed
-
Fabric
-
Thread
-
Pins or clips
-
Sewing machine
-
Rotary cutter, ruler, and cutting mat or scissors and measuring tape
Step 1: Select Two or Three Fabrics
First, think about how you want the pillowcase to feel against your face. Do you prefer crisp cotton, fuzzy flannel, or luxurious minky? Often, the best quality fabrics for this purpose are those intended for quilts and blankets—they have a high thread count and are durable. Once you decide on the type of fabric, choose the design. Your choice of color and pattern will enhance your personal style, whether it’s cozy chic, sophisticated boho, desert minimal, or anything in between.
The following instructions explain how to create a pillowcase with a body, cuff, and accent. All three pieces can be made from different fabrics, or the body and cuff can be made from the same fabric. You will need the following amounts of fabric; however, if you choose flannels, you’ll need a few extra inches to account for significant shrinkage.
- 3/4 yard (27 inches) for the body
- 1/4 yard (9 inches) for the cuff
- 2 inches for the accent
Personalize the appearance of a pillowcase by selecting colors and prints that either complement your bedding or add a bold accent to the room.
Image Credit:
Tracie Henkel
Step 2: Prepare the Fabrics
Wash, dry, and iron the fabrics to pre-shrink them. (Do not iron minky because the heat can melt the synthetic fibers.) Fold each piece of fabric in half, bringing the selvages together. Lay the pieces on top of each other, aligning the folded edges. Trim off the selvages with a rotary cutter or scissors. Now all the pieces should be the same width.

Fabric usually isn’t exactly the same width, so layer the pieces and cut off the selvages (woven edges) so that all the pieces are the same width before you begin sewing.
Image Credit:
Tracie Henkel
Fold the accent strip in half lengthwise, with the wrong sides together. Press.
Step 3: Assemble the Pieces
In order to hide the unfinished edges of the fabric, we will utilize the roll-up method, which is also known as a tube, hot dog, or burrito.
- Start by laying out the cuff fabric with the right side facing up. Place the accent strip on top of the cuff, aligning the raw edges at the top.
- Position the accent strip on top of the cuff, aligning the raw edges at the top.
- Layer the body fabric on top of the other two pieces with the wrong side facing up. Match the raw edges at the top.
- Secure the layers in place using several pins or clips.
- Roll up the length of the pillowcase body to expose the lower edge of the cuff. Keep the rolled-up fabric away from the top edge to prevent it from getting caught in the seam.
- Fold up the lower edge of the cuff, enclosing the rolled-up body fabric. Using the hot dog analogy, envision the cuff as a bun that encloses the tube of fabric.
- Reattach the fabric pieces with pins or clips to hold all the layers in place. Stitch the long seam 1/4 inch from the edge.
Step 4: Remove the Pillowcase Body
- Reach inside the cuff of the pillowcase and pull out the body. Now all the pieces are connected and the raw edges of the seam are enclosed within the cuff.
- Press along the seam and folded edge of the cuff to ensure that the unit lies flat.
- Press the accent fabric towards the cuff.

All three pieces of the pillowcase are neatly joined together with one seam.
Image Credit:
Tracie Henkel
Step 5: Sew Pillowcase with French Seams
The only remaining step is to sew the side and bottom of the pillowcase together. To accomplish this, we will use a two-step process known as a French seam to conceal the raw edges of the fabric.
With the wrong sides together, sew the side and bottom of the pillowcase.
Image Credit:
Tracie Henkel
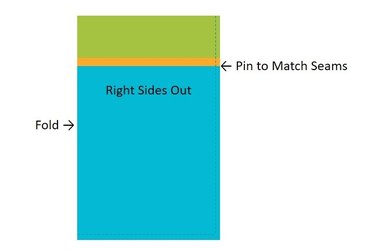
- Fold the pillowcase in half with the wrong sides together. Align the seam lines and folded edges of the accent strip and secure with pins or clips.
- Sew 1/4 inch from the edge, pivoting at the lower corner.
- Once the seam is sewn, trim the seam allowance to approximately 1/8 inch.
- Turn the pillowcase inside out, pushing out the corners. Press.
- Sew the side and bottom seam again, 1/4 inch from the edge, backstitching a few stitches at the beginning and end of the seam for added strength. This seam encloses the raw edges of the fabric, providing a tidy finish inside the pillowcase.
- Turn the pillowcase right side out and press. You’re done!

Don’t feel restricted by our suggestion of how many pillows to use on your bed. If you enjoy reading in bed, you might even use multiple pillows.
Image Credit:
TriggerPhoto/iStock/GettyImages
A minimalist appearance doesn’t have to lack personality, and a bed doesn’t necessarily require a stack of pillows and shams to appear cozy. Make a style statement with the essentials, and you’ll create the perfect setup for yourself.
