
Quck answer
To winterize a sprinkler system, follow these steps:
1. Turn off the water supply to the sprinkler system.
2. Drain any remaining water from the system by opening all the valves and allowing the water to flow out.
3. Use an air compressor to blow out any remaining water from the pipes and sprinkler heads.
4. Disconnect and drain the backflow preventer to prevent freezing damage.
5. Insulate any above-ground pipes or valves with insulation tape or foam sleeves.
6. Cover the sprinkler heads with protective caps or bags to prevent them from freezing.
7. Store any removable components, such as timers or sensors, indoors for the winter.
By following these steps, you can protect your sprinkler system from freezing temperatures and prevent costly damage.
If you own a lawn sprinkler system and reside in a region that experiences winter temperatures at or below 32 degrees F, it is crucial to remove any water from the system before the cold weather arrives. Failure to do so can result in various issues, such as frozen pipes, cracked sprinkler heads, broken valves, or damage to the backflow preventer, which is the expensive brass-and-copper device with multiple valve handles. The objective of winterizing a sprinkler system is to eliminate water from every sprinkler zone and the backflow plumbing as much as possible. Once the blowout process is complete, it is necessary to slightly open the backflow valves to allow any remaining water to freeze without causing damage due to pressure buildup.

Proper winterization of a lawn sprinkler system is essential to prevent damage during the colder months.
Can You Do It Yourself?
If you own a decent-sized air compressor, you can perform the winterization process yourself instead of hiring a professional, which may cost around $60 to $120 or more. The steps involved will be the same as those followed by professionals, but it will take you more time as you will need to refill your compressor and blow out each zone multiple times. Professionals utilize large industrial air compressors that operate continuously and deliver a significant volume of air, eliminating the need for frequent tank refills like you would require. The difference lies in the volume of air, not the pressure. A standard shop-sized compressor can provide more than enough pressure to blow out a sprinkler system. However, it is essential to exercise caution and avoid excessive pressure, as it can cause damage to the sprinkler components. The recommended maximum air pressure is 80 psi (pounds-per-square-inch), although you typically do not require that much pressure.
Additionally, it is important to note that sprinkler systems are not universal and can vary significantly. While some systems have the backflow preventer located outdoors, others may have it underground or indoors. Moreover, backflow preventers and other plumbing components can have different configurations, as well as varying numbers and types of valves. Therefore, it is advisable to familiarize yourself with the key parts of your specific system, including the backflow preventer, water shutoff, and any bleed valves or nipples used for draining water from the backflow. The shutoff valve of the system is typically situated in a basement or crawl space to prevent freezing of the water on the supply side of the valve.
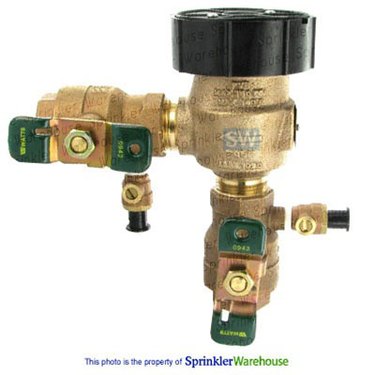
Backflow preventer of a sprinkler system.
Items Needed
-
Bucket
-
Flathead screwdriver
-
Air compressor
-
Air hose and fittings (if necessary)
How to Drain a Sprinkler System
Step 1: Close the Water Supply
To begin, turn off the water supply to the sprinkler system by closing the shutoff valve. Most shutoff valves have a lever-type handle, so turn it 1/4 turn until the handle is perpendicular to the water pipe. For ball valves, a handle parallel to the valve body means it is fully open, while perpendicular means it is fully closed. If there is a bleeder nipple or valve near the shutoff valve on the sprinkler side, place a bucket underneath it and remove the cap or open the valve. A small amount of water may come out initially, and more will come out later, so leave the bucket in place until the last step.
Step 2: Release the Backflow Plumbing
Open all the valves on or near the backflow preventer. This includes the conventional ball valves on each side of the backflow and the test cock valves. The test cocks resemble the head of a slotted screw and can be operated with a flathead screwdriver. They are open when the slot is parallel to the piping and closed when the slot is perpendicular. By opening these valves, water in the backflow plumbing will drain out through the bleeder nipple or valve near the system shutoff valve (where the bucket is placed).

Test cock valve in closed position.
Image Credit:
Zoro
Step 3: Attach the Air Hose
Close the valve and test cock on the supply side of the backflow preventer (not the sprinkler side). Connect the air compressor hose to the blowout port near the backflow preventer. Your system may have a specific connection for this, or you may need to install a quick-connect fitting to a port on the sprinkler-side piping. The important thing is to ensure that the air blows out into the sprinkler system and not back through the backflow preventer, as it can cause damage. If your system has a shutoff valve isolating the backflow from the air port, close this valve.
Step 4: Activate the First Zone
Set the sprinkler system controller to manually run the zones. Select the first zone in the system and add extra time to the time clock. Start the clock to open the zone valve. If you control your sprinkler zones manually, open the first zone as usual.
Warning
Make sure the zone is open and running before blowing out the zone.
Step 5: Blow Out the First Zone
Adjust the output pressure of your compressor to a maximum of 80 psi. Turn on the compressor to deliver air through the hose and into the first zone’s sprinkler piping and heads. Initially, water will be ejected from the sprinkler heads, then they will start to spit and sputter as the water drains out of the lines. Eventually, the heads will emit a mist or “fog,” indicating that the zone has been sufficiently drained. Depending on the size of your compressor, you may need to pause and refill the compressor tank before continuing to blow out the zone until the heads start to emit a fog.
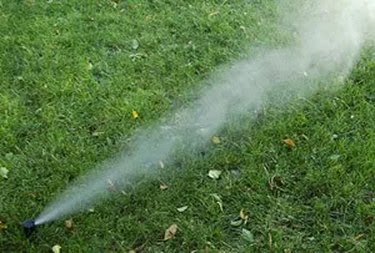
The sprinkler head starts to release fog while the blow-out continues.
Image Credit:
NBC Right Now
Step 6: Clear Out the Remaining Zones
Stop the airflow through the hose by turning off the compressor. Set the sprinkler controller to activate the next zone, then restart the compressor. Clear out the second zone in the same manner as the first. Repeat this process until all of the zones have been cleared out. Since you are using a compressor of a size typically found in a shop, you may need to repeat the entire blowout process one or more times until all zones only emit fog. (At least next year you will know how many rounds it takes.) Remember to open each zone before turning on the air pressure. Turn off the compressor when finished.
Step 7: Finish the Task
Turn off the sprinkler system at the controller. Remove the air hose and any additional fittings from the backflow plumbing and replace any port caps, as necessary. Open all of the ball valves and the test cocks on the backflow plumbing partway by turning the valve handle or cock slot 45 degrees towards the piping (water flow). Leave the valves in this position throughout the winter. This allows any trapped water inside the pipes to escape if it freezes (air pressure helps prevent pipe bursts). Finally, replace the bleed cap or close the bleed valve near the water shutoff to the system.
Now you are prepared for winter! (At least you won’t have to mow.)
