

Quck answer
To install an adjustable shelf system, follow these steps:
1. Measure the space where you want to install the shelf system.
2. Purchase an adjustable shelf system that fits your measurements.
3. Gather the necessary tools, including a drill, screws, and a level.
4. Mark the positions for the shelf brackets on the wall, ensuring they are level.
5. Drill pilot holes for the screws and attach the brackets to the wall.
6. Insert the shelf supports into the brackets and adjust them to your desired height.
7. Place the shelves on top of the supports, making sure they are secure.
8. Test the stability of the shelves by applying pressure.
By following these steps, you can easily install an adjustable shelf system to organize and maximize your storage space.
Adjustable shelves are an ideal shelving system because they are secure, adjustable, and expandable. The main supports, known as standards, are mounted to the wall studs, while the individual shelf supports lock securely into the standards. This ensures that the shelves are stable and can be easily rearranged. Additionally, adjustable systems can be expanded by adding more standards and shelves.
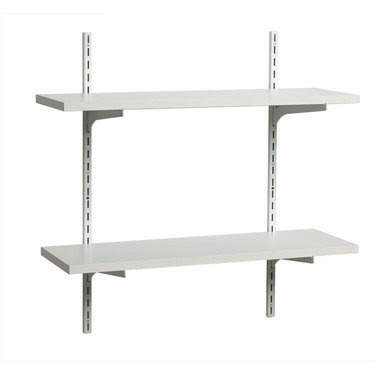
Adjustable shelving systems are sturdy and offer great flexibility.
Image Credit: Knape & Vogt/Home Depot
Basics of Adjustable Shelving
The key to a successful installation is ensuring that the standards are perfectly vertical and level with each other. This can be achieved through careful layout and marking using a level. It is also important to position the standards over the centers of the wall studs, which can be done easily using a stud finder.
Typically, walls have studs spaced 16 inches apart. Depending on the shelving system, standards can be installed on every stud or every other stud. For wood shelves, the supports should be no more than 32 inches apart, meaning a vertical standard should be installed on every other wall stud. Wire shelving should follow the manufacturer’s recommendations for support spacing. For heavier loads, it is recommended to install a shelving standard on every wall stud for increased support.

Twin-track systems have double-column tracks for brackets and are designed to hold heavier loads.
Image Credit: Rubbermaid
Adjustable shelves come in two types: single-track and twin-track. Single-track systems have standards with a single column of slots for flat metal brackets. Each bracket has two hooks for locking into the standard. Twin-track systems are heavy-duty and have standards with two columns of slots for wider brackets with four hooks each. Twin-track systems also allow the option of screwing the brackets to the shelves to prevent sliding. The basic installation steps are the same for both types of systems.
Materials Needed:
- Adjustable shelving system
- Stud finder
- Pencil
- Tape measure
- 4-foot level
- Drill-driver with screwdriver tip
- 1/8-inch drill bit
Installation Steps:
Step 1: Mark the Stud Locations
Use a stud finder and a pencil to locate and mark the wall stud for each standard. Mark both side edges of each stud to ensure proper placement of the standard at the stud’s center.
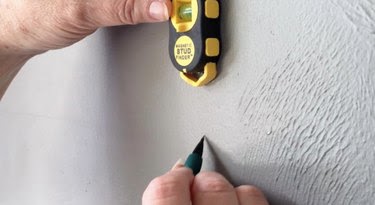
A stud finder is the most effective tool for locating studs to anchor wall standards.
Image Credit:
Studfindertool.com
Step 2: Position the First Standard
To start, measure from the floor and mark the desired height for the top of the shelf standard. Make the mark at the center of one of the wall studs. Center the first standard over the stud and align its top end with the height mark. Use a 4-foot level to ensure that the standard is perfectly vertical. Use the pencil to mark the screw hole location on the wall by inserting it into the top screw hole of the standard. Set the standard aside.
Step 3: Install the First Standard
Drill a pilot hole at the marked screw location using a drill-driver and a 1/8-inch bit. Position the first standard on the wall and secure it to the stud using one of the provided screws. If the standard has a top and bottom end, make sure you install it right-side-up.
Use the level to align the standard vertically, then secure it near the bottom end with another screw. Install a screw through each remaining screw hole in the standard. If the screws are difficult to drive all the way, drill pilot holes through the screw holes in the standards.
Tip
If your shelving system did not come with screws or if the provided screws seem too small, use long, coarse-thread wood screws. Avoid using drywall screws, as they are not designed to support heavy weight.
Step 4: Install the Remaining Standards
Using the level placed over the top of the first standard, make a corresponding mark at the next stud location for the next standard. Transfer the exact height of the first standard to this mark. Mark the center of the stud.
Position the second standard over the center of the stud, aligning its top end with the height mark. Install the second standard following the same method used for the first one, starting with securing the top, then aligning the standard vertically and securing the bottom before adding the remaining screws. Install the rest of the standards using the same techniques.
Step 5: Attach the Brackets
Attach the brackets to the standard at the desired heights. To ensure that the brackets for each shelf are level with one another, count the number of slots from the top or bottom of the standards for each bracket location. Make sure each bracket is fully inserted into the standard slots.
Step 6: Install the Shelves
Place the shelves onto the brackets, ensuring they are centered side to side or positioned as desired. Use the level to align the shelves perfectly by checking their ends.
If you have twin-track shelving, you can secure the shelves to the brackets by driving a small screw through the hole near the tapered end of each bracket and into the bottom of the shelf, if desired. Make sure the screw length does not poke through the top surface of the shelf.
