
Quck answer
Installing undermount sinks can seem daunting, but it can be done in 7 easy steps:
1. Measure and mark the placement of the sink on the countertop.
2. Cut the hole for the sink using a jigsaw or router.
3. Apply adhesive to the rim of the sink and place it into the hole.
4. Secure the sink with clips or brackets provided.
5. Connect the plumbing by attaching the drain and water supply lines.
6. Check for any leaks and make adjustments if necessary.
7. Finish the installation by sealing the edges of the sink with silicone caulk.
Following these steps will ensure a successful installation of undermount sinks.
Professional plumbers can install undermount sinks in about 30 minutes, but for the average person, this home improvement project may take longer. Undermount sinks are mounted beneath the countertop without a rim, relying on clips or rails for support. This can be challenging, especially when working with concrete or stone countertops.
However, there is a trick that professionals use to make this process easier, which we will explain shortly. Even with this trick, there is another potential challenge with this DIY project: cutting an opening in the countertop. Since the edges of the sink will be visible, they must be cut cleanly and accurately, and then polished. This can be difficult, so it is recommended to hire a professional to cut the sink opening and faucet holes. Once that is done, our guide can help you with the rest of the installation.
Important Considerations Before Starting

Image Credit:
Stephen Paul for Hunker
If you have experience installing drop-in basins in the kitchen, you already know the basics of connecting the drain and faucet, which is similar for undermount sink installation. However, mounting the sink itself can be challenging due to its weight.
Lightweight sinks made of copper or stainless steel are easier to handle, and manufacturers usually provide the necessary supplies and instructions. Heavy basins made of cast iron, composite granite, or fireclay require additional support inside the cabinet. But don’t worry, adjustable support rails are available for purchase. You may need assistance from another person, though.
Here are the supplies you will need for the installation:
Materials and Tools
-
Acetone or alcohol
-
Sink clips
-
Sink posts and brackets
-
Two-part epoxy cement
-
Silicone caulk
-
Wingnuts
-
Headlamp
-
Damp rag
-
Bar clamps
-
Pencil
-
Faucet
-
Sink-drain assembly
-
Garbage disposal (optional)
-
P-trap assembly
-
An extra set of hands
Attaching an Undermount Sink
Image Credit:
Stephen Paul
Installing an undermount sink can be challenging, especially when it comes to supporting it while drawing its outline and setting the clips. Finding the right support height can be difficult, and even if you do, fitting it tightly under the sink can be a challenge. Here’s a simple solution: place a 2×4 board across the sink opening parallel to the countertop. Have someone hold the sink in position, pass a bar clamp through the drain hole, rest it on the board, and tighten it to secure the sink against the countertop. Adjust the position of the sink before fully tightening the clamp.
Choosing Sink Clips and Supports

Image Credit:
Stephen Paul for Hunker
When you buy a new sink, it typically comes with sink clips. However, if you’re installing a recycled sink or have misplaced the clips, you’ll need to purchase them separately. The most common type of clips consists of threaded posts attached to flat disks with holes, along with metal brackets that fit over the posts and secure with wingnuts. Alternatively, you can use cabinet brackets that you screw to the sides of the cabinet and wedge under the sink rim to firmly secure it against the cabinet.
For heavier basins like double-bowl cast iron sinks, you can also use a sink rail. This rectangular metal railing is screwed to the front, back, and sides of the cabinet. It features adjustable metal rods that pass between the sides of the rail under the sink, with adjustable feet that can be tightened to level the sink and push it against the countertop.
Installation Steps

Image Credit:
Sanford Creative
Here’s a step-by-step guide for installing your sink. Make sure you have all the necessary supplies before starting. Follow the guide below to plan your installation.
Step 1: Clean up and prepare.

Image Credit:
Paul Anderson for Hunker
Clear out the sink cabinet and remove all shelves to create more working space. Use a headlamp for better visibility while working.
Step 2: Clean the underside of the countertop.

Image Credit:
Sanford Creative
Wipe the underside of the countertop with a damp rag or cloth soaked in acetone or alcohol to remove dust and oils. Dust and oils can affect the adhesion of epoxy and silicone caulk, so it’s important to clean thoroughly. Also, clean the entire sink area to prevent debris from getting stuck in crevices.
Step 3: Secure the sink with clamps.
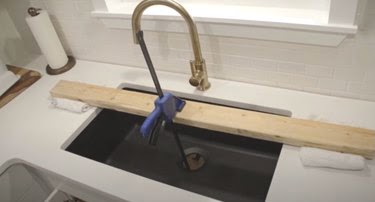
Image Credit:
Lowe’s
Have someone assist you in positioning the sink under the cutout and use a bar clamp to secure it in place. Make sure to readjust the position before fully tightening the clamp. If the sink has two drain holes, use two clamps.
Step 4: Attach the posts for the sink clips.
Image Credit:
Home Depot
Create a contour around the sink rim and use a pencil to mark the position of each clip. Follow the sink manufacturer’s instructions to determine the spacing of the clips. If there are no instructions, keep the clips no more than 10 inches apart for a lightweight sink and no more than 6 inches apart for a heavy sink. Remember that it’s better to have too many clips than too few.
Prepare enough epoxy resin (such as PC-7 or JB Weld) for all the posts. Apply a generous amount of the resin, place the post, and allow the glue to set overnight.
Step 5: Apply caulk to the sink rim.

Image Credit:
Home Depot
Loosen the bar clamps and lower the sink to the bottom of the cabinet. If possible, remove it from the cabinet completely. This may also be a good time to install the faucet.
Apply a line of caulk around the rim, ensuring that the adhesive stays on the outer edge. Position the sink under the cutout, adjust it so the rim aligns with the outline you drew, tighten the clamps, and clean up any excess caulk.
Step 6: Install brackets to secure the sink.

Image Credit:
Amazon
Slide a bracket over each post, position the sink so that the rim overlaps, attach a wingnut, and tighten it completely. You can tighten it by hand or use locking pliers if desired. It’s advisable to let the silicone caulk set overnight before removing the clamps.
Step 7: Connect the plumbing.
Image Credit:
Lowe’s
If you haven’t done so already, install the faucet. Connect it to the water supply valves. Attach a sink drain assembly to the drain hole, or install a garbage disposal if necessary. Finally, connect the drain to the P-trap assembly and the wall drain.
What is the cost of installing an undermount sink?

Image Credit:
Stephen Paul
Similar to many plumbing-related tasks, you can save money by installing the sink yourself. According to HomeAdvisor, professional undermount sink installation can cost up to $2,000, not including the price of the sink or any necessary supplies. Additionally, plumbers charge by the hour, and if you require cutting of stone or granite countertops, expect the cost to nearly double. On the other hand, if you perform the installation on your own, you could spend less than $400 in total.
