Quck answer
To install a drop-in sink, follow these steps:
1. Measure the dimensions of the sink opening in your countertop.
2. Purchase a drop-in sink that fits these dimensions.
3. Turn off the water supply to the sink.
4. Disconnect the plumbing connections from the old sink.
5. Remove the old sink from the countertop.
6. Apply a bead of silicone caulk around the edge of the sink opening.
7. Carefully lower the new sink into the opening, making sure it is centered.
8. Press the sink down firmly to create a waterproof seal with the caulk.
9. Reconnect the plumbing connections.
10. Turn on the water supply and check for any leaks.
With these steps, you can easily install a drop-in sink in your kitchen or bathroom.
Drop-in sinks, also known as self-rimming sinks, are a popular choice for many homeowners. This type of sink has a rim that sits on the surface of the countertop, distinguishing it from under-mount sinks that are attached beneath the countertop. Installing a drop-in sink can be a relatively easy DIY project, although it does involve some plumbing work. Before you begin, it’s important to complete the plumbing connections, including mounting the faucet and installing the drain strainer.
If your countertop doesn’t have a pre-cut hole for the sink basin, you will need to cut one. The difficulty of this task depends on the material of your countertop. Wood, laminate, and cultured marble or solid surface countertops can be easily cut with a jigsaw. However, if your countertop is made of stone or stainless steel, you will need a grinder and considerable skill. In this case, it may be best to hire a professional to cut the hole for you.
Read the Instructions
Before starting the installation process, take the time to read the sink’s instruction manual. The manual will provide valuable information on how to secure the sink to the counter using the included clips. It will also specify the shape and dimensions of the hole that needs to be cut into the counter, and may even provide a template to make this task easier.
Tip
If you are replacing an old sink, you don’t need to worry about cutting a hole. However, it is important to thoroughly clean any caulk residue left around the existing hole. Even a small amount of caulk can prevent the sink rim from sitting flat on the countertop.
Installation Steps

Image Credit:
Pawel_B/iStock/GettyImages
Materials You’ll Need
-
Pencil
-
Tape measure
-
Ruler
-
Jigsaw
-
Drill and twist bits
-
2 sawhorses
-
2 x 4s (20
-
Drain assembly
-
Plumber’s putty
-
2 pairs of channel-lock pliers
-
Faucet
-
100 percent silicone caulk
-
Screwdriver
Step 1: Mark the Cutout on the Countertop
Check the sink’s instruction manual for a cutting template. This template may be printed on the sink’s cardboard packing carton, or it may be included as a separate paper template inside the carton. If a template is provided, place it on the countertop, center it, and use a pencil to trace the cutting line for the sink hole. If the manual only gives dimensions and the sink is a regular shape (such as square), you can use a tape measure, ruler, and pencil to measure and draw the lines.
If you don’t have a manual or template, you can measure the dimensions yourself, but it’s usually more accurate, especially with oval sinks, to place the sink upside-down on the countertop, center it and trace the outline of the rim. Remove the sink and trace a second outline inside the first outline. This outline should be inset by a distance equal to the measurement from the outside of the rim to the body of the sink.
Tip: The upside-down tracing method works for any sink whose shape is symmetrical from left to right and from top to bottom, which is most of them. If your sink has a non-symmetrical shape, draw its outline on a piece of cardboard, cut the shape out of the cardboard and place it on the counter to draw the sink outline. Then, draw a second outline to match the shape of the sink body, inset within the rim outline.
Step 2: Cut the Hole for the Sink

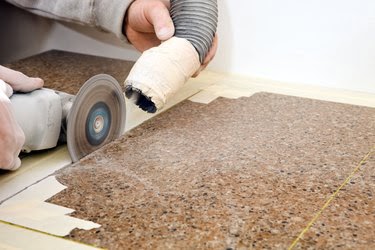
An angle grinder is the best tool for cutting stone.
Image Credit:
BanksPhotos/iStock/GettyImages
Cut along the inner line with a jigsaw. To get the jigsaw started, drill a hole on the line large enough to allow you to insert the blade. Remove the cutout, lower the sink in the hole and make sure it sits flat on the countertop on all sides. If not, widen the hole as needed. Remove the sink when the hole is ready.
Step 3: Attach the Drain Fittings

It’s best to install the drain before setting the sink in place.
Image Credit:
dima_sidelnikov/iStock/GettyImages
Set up a pair of 2 x 4s on two sawhorses and space them to support the sink from its rim. Set the sink on the 2 x 4s and attach the drain fitting:
1. Roll some plumber’s putty in your fingers to make a thin rope and wrap the rope around the underside of the drain strainer flange.
2. Set the strainer body into the drain hole and push down to compress the putty onto the sink drain opening.
3. Slide the rubber gasket and washer that came with the drain fitting onto the threaded end of the strainer from underneath the sink, then screw on the mounting nut and tighten it by hand.
4. Hold the strainer body steady by inserting the handles of a pair of channel-lock pliers into the drain fitting from above. Then, use a second pair of channel-lock pliers to tighten the nut. Don’t over-tighten or you could damage the sink. Wipe excess putty that has oozed out from under the strainer, using a rag.
If you’re installing a garbage disposal, the process is similar to that for installing a drain fitting. Attach the disposal’s coupler to the sink drain opening, following the installation instruction in the garbage disposal manual. The disposal itself is heavy, so it’s best to wait until the sink is in place before attaching it to the coupler.
Step 4: Install the Faucet
Insert the facet supply tubes through the holes in the sink deck and secure the faucet to the sink with the mounting nuts or mounting collar supplied with the faucet. Connect the sprayer if you’re installing a kitchen sink. If you’re dropping in a bathroom sink, this is a good time to connect the pop-up stopper assembly.
Step 5: Attach the Holding Clips
For certain sink models, it may be necessary to install the holding clips before placing the sink into the cutout. Refer to the installation manual to determine if this applies to your sink. If so, follow the instructions provided. The clips are typically inserted onto a rail beneath the rim and should be evenly spaced around the sink.
Step 6: Lower the Sink Into Place
Apply a continuous line of 100 percent silicone caulk around the outer edge of the cutout, approximately 1/2 inch from the edge. Carefully lower the sink into the cutout and press the rim down into the caulk to ensure a secure bond.
Step 7: Secure the Clips

Image Credit:
Lowes
If you have not already done so, attach the clips to the sink, spacing them evenly. Using a screwdriver, tighten the screws on each clip, starting with the one in the front center, then moving to the back center, and finally the center of each side. Once these are secure, tighten the remaining clips.
Tip
Tighten the screws just enough to align the rim flush with the countertop, being careful not to overtighten and risk damaging the underside of the countertop.
Step 8: Apply Another Line of Caulk

Image Credit:
The Home Depot
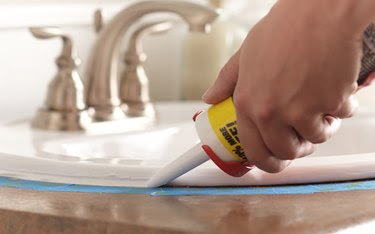
Remove any excess caulk that may have seeped out from beneath the sink rim using a cloth, then apply another line of caulk along the rim’s edge. Use your finger to smooth and shape the caulk, ensuring there are no gaps between the sink and the countertop. This second line of caulk provides added protection against dirt buildup and water leakage.
Step 9: Connect the Faucet and Install the Drain Fittings
Attach the faucet supply tubes to the shut-off valves located beneath the sink, using flexible supply tubes. If your sink has a garbage disposal, follow the installation instructions provided with the disposal to secure it in place. Connect the P-trap assembly and attach it to the branch drain pipe.
Tip
Remember that the garbage disposal will need to be plugged in or hardwired for power. Wait until all plumbing work is complete and you have checked for any leaks before doing this.


