

Quck answer
Vinyl siding is a popular choice for home exteriors due to its durability and low maintenance. If you need to cut vinyl siding for a project, here are some simple steps to follow:
1. Measure and mark: Use a tape measure to determine the length you need to cut. Mark the measurement on the vinyl siding with a pencil or marker.
2. Score the siding: Use a utility knife or vinyl siding snips to score the siding along the marked line. Apply firm pressure and make multiple passes if needed.
3. Bend and snap: Once the siding is scored, gently bend it along the scored line. The vinyl siding should snap cleanly along the score.
4. Smooth the edges: Use a file or sandpaper to smooth any rough or jagged edges left from the cut.
Remember to always wear safety glasses and gloves when working with vinyl siding. With these simple steps, you can easily cut vinyl siding for your home improvement projects.
When you are installing vinyl siding, it is important to make precise cuts at the ends to ensure a tight fit against the trim or a seamless fit inside a J-channel. You will also need to make at least one vertical cut to trim the last piece of siding on a wall. Vinyl is a relatively easy material to cut, and you can use various everyday tools for the job.
For larger projects, a circular saw with the appropriate blade is ideal for making end cuts. However, for smaller jobs, tin snips or a hand saw can be used. A utility knife is the best tool for making vertical cuts along the length of a vinyl siding plank. You can score the material and break it similar to cutting drywall, but because vinyl is less forgiving, precise measurements and cuts are necessary.
Marking the Cutting Lines and Scoring the Vinyl Plank

Accurate measurements are crucial for precise cuts.
Image Credit:
P. J. Fitzpatrick, Inc.
When crosscutting vinyl siding, you only need an accurate measurement of the plank’s length and a speed square to draw a perpendicular cut line. Professionals prefer to draw the cut line on the back of the plank instead of the front for two reasons. First, it prevents the cut line from being visible after cutting. Second, it reduces the risk of chipping the face of the plank when using a power saw.
Similarly, when making vertical cuts, draw the cut line and score it with a knife on the back of the plank. It is important to use a straightedge when drawing the line and to keep the straightedge in place while scoring. Scoring freehand can easily result in an uneven edge.
Invest in a Vinyl Cutting Blade
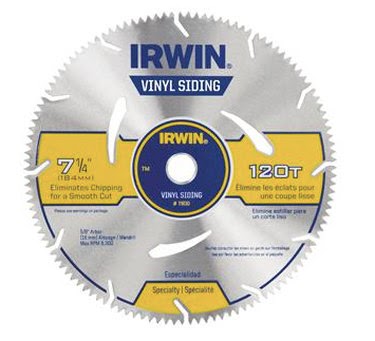
A vinyl cutting blade prevents chipping.
Image Credit:
Irwin
Experienced siding installers know that a conventional circular saw blade can cause damage to thin and flexible materials like vinyl, even when cutting from the back of the plank. Traditionally, installers would use a plywood-cutting blade with a high tooth count and install it backward in the saw. However, this technique makes the saw difficult to control and increases the risk of damaging the plank or causing accidents. Blade manufacturers now offer vinyl-cutting blades, which are specifically designed for this purpose and work much better than using a blade backward.
To achieve the best cut, support the plank on a workbench and allow only a small section to hang over the edge. If you need to cut a plank in half, support the entire plank on a work surface, set the blade depth to about 3/4 inches, and allow the blade to slightly cut into the workbench surface during the crosscut. This method ensures a clean cut.
Cutting Crosscuts and Curves with Tin Snips or a Rotary Tool

Many installers prefer using tin snips for all cuts except the longest ones.
Image Credit:
Modern Builders Supply, Inc.
A good pair of tin snips can create a precise cut that is even neater than a cut made with a power saw. In addition to making clean crosscuts, tin snips are the only practical choice when you need to make a curved cut to fit the siding around an obstacle like a vent pipe. Make sure to firmly hold the siding while cutting and only close the jaws of the snipper about 2/3 of the way on each cut. This not only results in a cleaner cut, but also makes the snips easier to handle.
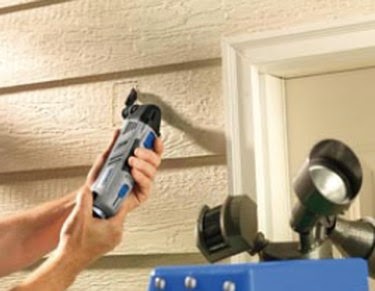
A rotary tool is the most effective tool for cutting siding that is already installed.
Image Credit:
Dremel
Curved cuts can also be made using a rotary tool equipped with a mini saw blade or a zip tool, which resembles a drill bit. This is the ideal tool to use if the siding is already installed and you need to create a hole for an electrical box or a vent.
How to Score and Snap a Vinyl Siding Plank
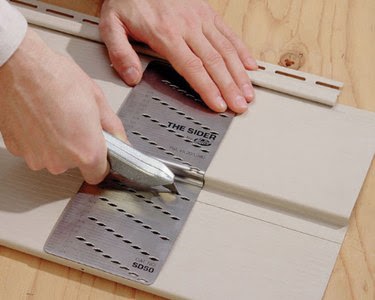
A cutting template simplifies the process of scoring a line along the length of a plank.
Image Credit:
Magnum Tools
If you have experience cutting glass or drywall, you are probably familiar with the basic procedure for making a longitudinal cut on vinyl siding. Draw a line, place a straightedge along the line, and use a sharp utility knife to score the line. With both hands, firmly hold the plank and bend it backwards, causing it to break cleanly along the scored line.
If you have a significant amount of siding to cut, it may be worth investing in a cutting template. This convenient tool attaches to the sides of the vinyl plank and has a series of notches for a knife blade. Select the notch that corresponds to the desired width, insert the knife blade, and slide the template along the length of the plank. This will result in a straight and clean scored line every time.
If the siding is already installed and you need to make a long cut for installing a window or any other reason, you may not be able to use the score-and-break method. Tin snips are likely the safest option, but if you are unable to free the plank enough to fit the snipper’s jaws around it, the next best alternative is to use a rotary tool.
