

Quck answer
To install a kitchen sink, follow these steps:
1. Gather the necessary tools and materials: a new sink, plumber’s putty, a wrench, a screwdriver, and a bucket.
2. Turn off the water supply and disconnect the plumbing connections under the old sink.
3. Remove the old sink by loosening the mounting clips or screws, and carefully lift it out.
4. Clean the area where the old sink was installed, removing any old caulk or debris.
5. Apply plumber’s putty around the edges of the new sink’s drain opening.
6. Carefully lower the new sink into place, aligning it with the countertop.
7. Secure the sink by tightening the mounting clips or screws.
8. Reconnect the plumbing connections, ensuring they are tight and leak-free.
9. Turn on the water supply and check for any leaks.
10. Enjoy your newly installed kitchen sink!
If you have basic plumbing and carpentry skills, you can install your new kitchen sink yourself. However, the type of sink you have will determine the installation method. There are four types of sinks available, each made from different materials.

A new sink can add elegance to your kitchen.
- Drop-in: Also known as a self-rimming sink, a drop-in sink has a rim that rests on the countertop and supports the weight of the sink. Installation is relatively easy as you simply lower the sink into a hole cut in the countertop. Drop-in sinks can be made from heavy materials like cast iron or composite materials, or lightweight materials like stainless steel.
- Undermount: This type of sink mounts underneath the countertop and is suitable for solid materials like stone or synthetic stone. It does not work with laminate or tile countertops. Undermount sinks are often suspended using brackets screwed to the bottom of the countertop, or hung from supports glued and screwed to the underside of the countertop. Due to the importance of securely installing the brackets or supports, many homeowners prefer professional installation.
- Farmhouse (drop-apron): A farmhouse sink has a wide apron in the front that extends beyond the edge of the countertop. It is typically deep and heavy, made from materials like porcelain or enameled cast iron. While it may appear to be attached to the underside of the countertop, most farmhouse sinks are actually supported by a structure built into the cabinet. Unless you are confident in your carpentry skills, it is recommended to hire a professional for installation.
- Integrated: Some countertops are designed to include a sink, eliminating the need for additional installation work. However, you will still need to connect the plumbing. Installing this type of sink involves installing the entire countertop.
Installing the rough-in plumbing, including connecting the water shut-off valves and branch drain assembly, is not typically part of sink installation and is often done by a professional plumber. However, connecting the mounted faucet to the water supply and the sink’s drain assembly to the drain pipes is a standard part of sink installation.
Tip
It is important to carefully read and understand the sink’s installation manual, as it contains specific details and specifications for that particular sink model. It may also provide a template to simplify cutting the countertop hole for the sink.
How to Install a Drop-In Kitchen Sink
Things You’ll Need
- Ruler
- Tape measure
- Pencil or felt tip marker
- Sawhorses
- Angle grinder
- Jigsaw
- Drill
- 3/8-inch drill bit
- Plumber’s putty
- Channel-lock pliers
Silicone caulk
Screwdriver
Step 1: Select a Sink
If you need to replace a sink, it is essential to choose a new sink that fits the existing cutout in the countertop. To do this, you can either remove the old sink and measure its dimensions with a tape measure or measure the dimensions of the countertop cutout. The dimensions of the sink’s basin should match the hole dimensions. Keep in mind that the sink’s rim will extend past the cutout and rest on the countertop for support.
If you are installing a sink for the first time in a countertop that does not have a cutout yet, measure the width of the countertop and select a sink that will fit. Pay attention to any support members in the cabinet that might obstruct the installation. If you plan to install the faucet on the countertop instead of the sink itself, make sure to allow sufficient extra space.
Step 2: Measure and Mark the Cutout (If Necessary)
If you are installing a new sink in a new countertop, you may need to cut a hole for it. Use a ruler, tape measure, and pencil or felt tip marker to draw the outline of the sink on the countertop. There are several ways to obtain the correct cutting dimensions:

When your sink has an irregular shape, use the template provided to outline the hole.
Image Credit:
The Home Depot
- Refer to the sink installation instructions for the hole specifications.
- Use the cutting template that comes with the instructions. This template is often printed on the cardboard carton that holds the sink or included as a paper template with the sink.
- Measure the outside dimensions of the sink body with a tape measure, excluding the rim.
- Create your own template by placing the sink upside down on a piece of cardboard, tracing the outline of the sink opening, and cutting out the cardboard. Then, reduce the size of the cardboard template to account for the width of the rim that hangs over the basin.
- Place the sink upside down on the countertop and trace the outline of the opening directly on the countertop. This method only works for regular shapes like square, rectangular, or oval. Draw another outline inside the first one to allow for the rim.
Step 3: Cut Out the Sink Opening
Use an appropriate cutting tool to cut out the hole. For stone or stainless steel, use an angle grinder, and for tiles, use a diamond blade saw. A jigsaw works best for most other materials. When using a jigsaw, drill a hole on the cutout line with a 3/8-inch drill bit to allow the jigsaw blade to go through. Then, carefully cut around the entire marked outline on the countertop. To prevent chipping on laminates, some professionals protect the surface where the outline is drawn with masking tape.
Tip
Test-fit the sink by temporarily placing it in the hole and make any necessary adjustments. The rim of a drop-in sink should sit flush with the countertop on all sides.
Step 4: Installing the Drain Assembly and Faucet
Before lowering the sink into the countertop opening, it is recommended to install the drain assembly. To do this, place the sink on a support that allows the drain hole to hang freely, such as a pair of sawhorses. Here’s how to install the drain assembly:

It is easier to install the drain and garbage disposal bracket before placing the sink.
Image Credit:
Lowes
- Take a length of plumbers putty and shape it into a thin rope. Wrap the putty around the underside of the flange on the sink strainer or garbage disposal coupler.
- Insert the strainer or coupler into the drain hole and push it down to compress the putty against the drain opening.
- Slide the rubber gasket and metal washer provided with the drain onto the threaded end that extends below the sink.
- Tighten the retaining nut fully using a pair of channel-lock pliers.
You should also install the faucet onto the sink before placing it. Follow the instructions provided by the faucet manufacturer. Typically, it involves inserting the faucet into the openings on the sink flange and threading mounting nuts onto the faucet’s tailpieces.
Step 5: Setting the Sink Clips and Supports
Some sinks require the installation of clips before setting them in place. Refer to the instruction manual for your sink for specific instructions. This is more common with lighterweight sinks made from materials like copper or stainless steel. Heavy sinks made of cast iron, composite, or solid-surface usually do not require clips.
Step 6: Placing the Sink and Securing It

Some individuals prefer to apply caulk underneath the sink rim instead of on the counter.
Image Credit:
Lowes
- Apply a continuous bead of pure silicone caulk around the sink opening on the countertop.
- Lower the sink into the opening and press down to compress the caulk.
- Secure the sink by attaching the provided clips onto the sink rails (if not done already according to the manufacturer’s instructions) and tightening the screws with a screwdriver. Tighten enough to make the rim flush with the countertop, but not excessively.
- Wipe away any excess caulk with a rag, then apply a new bead around the rim to prevent dirt and water from getting in.
Step 7: Connecting the Faucet, Garbage Disposal, and Drain
The final step is to connect the faucet, garbage disposer, and drain assembly.
To install a sink, the final step is to connect the drain and the faucet. Use flexible supply tubes to connect the faucet tailpieces to the shut off valves. Make sure to choose the right length of tubes that can easily span the required distance without causing any issues under the counter. If needed, install the garbage disposal by sliding it into the coupler on the sink drain opening and giving it a quarter turn to secure it. Connect the dishwasher drain tube to the nipple on the side of the garbage disposal if necessary. For a double sink, connect the P-trap assembly, which consists of drain tubes from each sink basin, to a common trap. Ensure that the shelving inside the cabinet can accommodate the bend in the trap, which will be several inches below the garbage disposal.
After completing the installation steps, it’s important to turn on the water and check for any leaks. Flush the faucet and fill the sink with about 2 inches of water. Check underneath for any leaks from the drain fittings and tighten them if needed. Open the drains to let the water flow out and inspect the P-trap assembly for leaks. Tighten any fittings in the P-trap assembly that are leaking. It is recommended to wait until this test is complete before plugging in or hardwiring the garbage disposal for safety reasons.
When installing an undermount sink, there are some differences compared to a drop-in sink. The hole for the sink must be slightly smaller than its inside dimensions to allow the countertop to overhang it. The amount of overhang is usually specified by the manufacturer. The sink needs to be supported in place while attaching it to support posts or brackets that are glued or screwed to the underside of the cabinet. Therefore, the drain assembly is usually attached after the sink is installed. Cutting the hole for the sink requires precision, as the countertop edges will be visible and must be smooth and straight. If the countertop does not have a pre-cut hole, it is recommended to hire a professional to do the cutting. Gluing support posts to the underside of the countertop is an important step in the installation process, and it is essential to clean the countertop with a solvent before gluing the posts according to the manufacturer’s instructions.
Installing an undermount sink can be challenging due to its weight, so a common technique used by contractors is to hold it in place while attaching it to the support posts.
- To secure the sink, place a 2 x 4 across the sink opening parallel to the front of the counter.
- Apply a continuous bead of silicone caulk along the top rim of the sink.
- With the help of a helper, hold the sink against the underside of the counter. Insert the end of a bar clamp through each drain hole of the sink and wedge it against the underside of the sink. Place the cranking end of each clamp against the 2 x 4 and tighten the clamp to firmly hold the sink in place.
- Align the sink within the perimeter of the supports or brackets attached to the underside of the countertop.
- Use the provided clips to secure the sink to the supports or brackets.
- Once the sink is in place and the clamps are removed, install the drain assembly.
Farmhouse Sinks

Installing a farmhouse sink typically involves modifying the cabinet.
Image Credit: Native Trails
When installing a farmhouse sink, it is necessary to make extensive modifications to the cabinet for support. Instead of cutting a hole in the countertop, a notch is cut for the sink to slide into. Additionally, a notch is cut in the front of the cabinet to accommodate the sink’s depth, and supports are added under the front and back of the sink.
It is recommended to hire a contractor to complete these modifications. Once they are done, the sink can be easily slid into place, and the drain assembly, garbage disposal, and faucet can be installed and connected.
Integrated Sinks
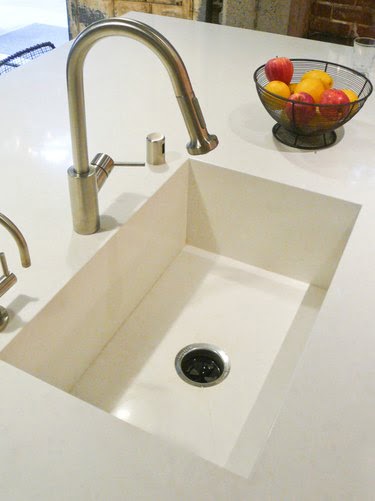
An integrated sink is a part of the countertop.
Image Credit: Amanzi
Installing an integrated sink doesn’t require any additional installation besides connecting the drain and faucet. However, installing the countertop itself is a precise job that is best left to a contractor, as it is a large and heavy unit. Cabinets with integrated sinks are often sold together and are a great option for kitchen construction or renovation. If you want to install an integrated sink on existing cabinetry, you will likely need to have it custom-built to fit.
