

Quck answer
Cutting mosaic tiles can be a tricky task, but with the right tools and techniques, it can be done effectively. Here are some steps to help you cut mosaic tiles:
1. Gather the necessary tools: You will need a wet saw or tile nipper, safety goggles, gloves, and a straight edge.
2. Measure and mark the tile: Use a straight edge to mark the area where you want to cut the tile. Measure carefully to ensure accuracy.
3. Wet the tile: If you are using a wet saw, wetting the tile can help reduce the risk of chipping. Dip the tile in water or use a spray bottle to wet it.
4. Cut the tile: If you are using a wet saw, carefully guide the tile through the blade, following the marked line. If you are using a tile nipper, position the tile in the nipper and apply pressure to break it along the marked line.
5. Smooth the edges: After cutting the tile, use a sanding block or file to smooth any rough edges.
Remember to always wear safety goggles and gloves when cutting mosaic tiles. Practice on scrap tiles before cutting the actual tiles to ensure accuracy and minimize mistakes.
Nowadays, mosaic tiles are sold in sheets with small individual tiles attached to a flexible mesh backing. These sheets are usually 12 inches square and the mesh can be easily cut using a utility knife. If you need to cut the individual small tiles, you can use the same methods as you would with individual tiles of the same material. The most recommended tool for cutting all types of tile is a wet saw with a diamond blade. However, for ceramic, porcelain, or stone tile, you can also use a manual tile snap cutter or tile nippers. Keep in mind that a wet saw is easier to use and produces cleaner cuts. If you need to trim glass tile that is too small for a wet saw, you can use wheeled glass nippers.

Mosaic tiles are attached to mesh backing.
Image Credit:
TST/Mosaic Tiles
Measuring and Marking Mosaic Tile for Cuts
When it comes to measuring and marking mosaic tile, there is nothing special about it compared to standard tile. However, with mosaics, you have the option to mark either the mesh backing or the top face of the tile. Just remember that if you need to cut the tile itself, you must cut it with the tile facing up and the backing facing down. In this case, you can transfer marks from the backside to the front side or mark the front side directly. If you are only cutting the backing, you can mark the mesh and cut on the backside of the sheet.
When measuring for cutouts, such as electrical boxes, you usually have to measure from the last full sheet of installed tiles. One thing to be cautious of is with tile sheets that have interlocking edges, like subway-style glass mosaics. Due to the staggered or alternating tile joints, the sheet’s edges are not straight. Therefore, when measuring for cuts, ensure that you measure from the tiles that will meet when the cut sheet is installed. In other words, if you measure from an indented space on the edge of the installed tile sheet, measure from a projecting tile on the sheet you will cut.
Alternatively, if there is no adhesive applied to the wall yet, you can simply place the sheet to be marked on the wall or floor, fitting it into place, and then mark the cutout on the tile faces. The spaces between tiles usually allow you to see through the sheet well enough to make your marks outlining the cutout.

Interlocking mosaic tile sheet.
Image Credit:
American Olean/Lowe’s
You can mark the mesh backing of mosaic sheets using a fine felt-tip marker. For marking the faces of tiles, use a carpenter’s pencil or a china marker (also known as a grease pencil or a glass marking pencil, available at home centers and art supply stores). Standard pencil lines may wash off under a wet saw, but a china marker will not. China marker lines can be wiped off the tile with a damp cloth. If you are working with glass tile, you can also use a Sharpie or a similar permanent marker on the face of the tile. Just be sure to test it first to ensure that it can be easily removed.
How to Perform Basic Cuts on Mosaic Tile
The most effective way to make straight cuts on mosaic tile is to use a wet saw. This allows the sheet to lie flat on the saw’s sliding bed, minimizing any disruptions to the individual tiles.
- On the front of the tile, mark the cut line using either a china marker or a felt-tip marker, depending on what is available.
- Place the tile sheet face up on the saw bed, aligning the cut line with the saw blade. Ensure that the nearest edge of the mosaic sheet is flush against the lip at the front of the saw bed.
- Switch on the saw and wait for it to reach its maximum speed. Make sure that the blade is being soaked with water.
- Using your hands, press down on both sides of the cutting line to firmly hold the tile sheet. Keep your hands clear of the blade.
- Carefully slide the bed into the blade to make the cut. Move slowly and steadily, avoiding any forceful pushing of the tile into the blade. Allow the blade to do the work. Once the cut is complete, move the tiles away from the blade and remove them from the bed.
- If desired, use a rubbing stone or sanding block to smooth or refine the cut edges of the tiles.
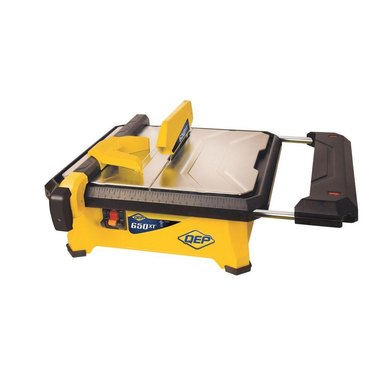
Tile wet saw
Image Credit:
QEP/Home Depot
How to Create Cutouts on Mosaic Tile
To create cutouts for electrical boxes and other obstructions, it is easiest if the cutout aligns with the joints between tiles. This allows you to cut through the mesh backing and remove the tiles and backing together to create the hole. However, if this is not possible, you have two options: If the cutout is a notch, you can cut in from the edge of the sheet. If the cutout is an interior cut, you can peel off individual tiles from the mesh backing, create the desired hole in the backing, and then trim each tile and stick it onto the wall once the rest of the sheet is installed. These cuts can be made using either a wet saw or tile nippers.
Standard tile nippers.
Image Credit:
M-D Building Products/Home Depot
To cut individual tiles with a wet saw, firmly support the tile with your fingers and gently move it into the saw blade. Always pay close attention to keep your fingers out of harm’s way. Wet saws are much easier and safer to use compared to table saws, but they can still cause serious cuts. If you are not comfortable making close cuts with the saw, opt for tile nippers instead.
To cut tiles with nippers, place the tile between the jaws of the nipper and squeeze the handles to break through the tile. Since mosaic tiles are typically small, most cuts can be made with just a single bite from the nippers. However, if the tile is relatively large or the cut is curved, take smaller bites to gradually reach the cut line.
Tip
For glass tile, use wheeled tile nippers. These function similarly to standard nippers, but instead of flat jaws, they have two carbide cutting wheels that effectively break the tile. These specialized nippers can be purchased from hardware stores and glass craft suppliers, and are commonly used by tile and stained glass artists and crafters.

The best option for cutting glass mosaic tiles is to use wheeled tile nippers.
Image Credit:
Marshalltown
Installation of Cut Mosaic Sheets and Tiles
When installing cut sheets of mosaic tile, they should be handled similarly to full sheets, but the cut pieces may be more flexible and require extra caution to align properly. Begin by placing a cut sheet into the adhesive on the wall, applying gentle pressure initially to prevent it from sliding. Align the tiles visually, by looking at the grout joints from two different angles, and adjust the position of the sheet as necessary. Finally, firmly press the sheet into the adhesive using a rubber grout float to ensure that all the tiles are flat and securely set in the adhesive. For individually cut tiles, it is recommended to “back butter” each tile by applying adhesive to the back and then placing it in position, ensuring that it is level with the surrounding tiles.
