

Quck answer
1. Start with a clear vision: Determine the final look you want to achieve before starting your IKEA hack project.
2. Choose quality materials: Opt for high-quality paints, fabrics, and hardware to elevate the overall appearance of your hack.
3. Invest in proper tools: Use the right tools to ensure precise cuts, smooth finishes, and secure attachments.
4. Measure twice, cut once: Accurate measurements are key to achieving a polished and professional outcome.
5. Sand and prime: Prepare the surfaces by sanding them and applying a primer before painting or staining.
6. Use masking tape: Create clean lines and prevent paint bleed by using masking tape when painting or adding patterns.
7. Apply multiple coats: Layering paint or stain will give your hack a rich and professional-looking finish.
8. Add decorative elements: Incorporate details like trim, decorative knobs, or metal accents to enhance the overall design.
9. Pay attention to details: Ensure that corners are neatly mitered, edges are smooth, and fabrics are properly aligned.
10. Consider balance and symmetry: Maintain a sense of visual harmony by arranging elements in a balanced and symmetrical manner.
11. Choose complementary colors: Select colors that work well together to create a cohesive and professional look.
12. Mix materials: Combine different textures and materials to add visual interest and elevate the overall design.
13. Incorporate lighting: Install stylish and functional lighting options to enhance the ambiance of your hack.
14. Use proper hardware: Select sturdy and appropriate hardware for your hack to ensure durability and a professional appearance.
15. Follow assembly instructions: Carefully follow the assembly instructions provided by IKEA to ensure a secure and stable final product.
16. Hide imperfections: Conceal any imperfections by using clever design tricks or adding decorative elements.
17. Pay attention to finishings: Use finishing touches like edge banding or trim to create a polished and professional look.
18. Consider proportion and scale: Ensure that the size and scale of your hack are appropriate for the space it will be placed in.
19. Take your time: Rushing the process can result in a sloppy outcome, so take your time and pay attention to detail for a super professional look.
Whether you’ve attempted and failed, or have successfully accomplished an IKEA hack, there is always more to learn when it comes to making your DIY projects look Insta-ready. How can you make your favorite hack appear professional and not like a Pinterest fail?
We reached out to home design bloggers, interior designers, and DIY experts for their advice on prepping, painting, sealing, and styling your favorite IKEA pieces, from insider tips to what to avoid.
1. Take your design scheme into account before choosing a hack.
Visit Page
https://www.hunker.com
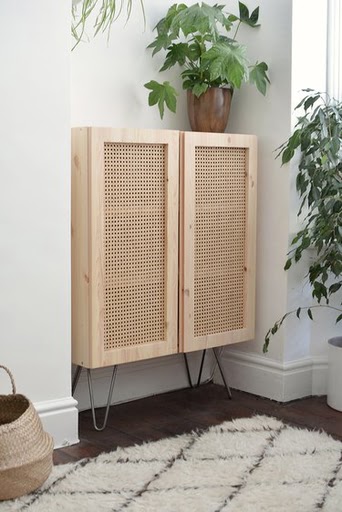
Image Credit:
Caroline Burke for Hunker
Prior to falling head-over-heels for an IKEA hack, ensure that you consider your current home decor. Modsy’s VP of Style, Alessandra Wood, tells Hunker, “Think about style, color, scale, and materials. You might love a hack, but if it feels out of place in your home, it can throw off your space.” Make sure the hack complements what you already have (or what you plan to have in the future). There’s nothing worse than completing a DIY project, looking at the finished product, and saying to yourself, “This doesn’t work.”
2. Delegate anything you’re not comfortable with to professionals (like power tools).
Visit Page
https://www.hunker.com
Image Credit:
Sara Albers for Hunker
Trisha Sprouse — Hunker contributor and owner of the Vignette blog — explains that while a seemingly simple upholstery piece like a bench or chair seat can be a fun DIY project, it can look amateurish if you don’t have experience with sewing or upholstery. It’s important to be realistic about what you can accomplish and to always keep safety in mind. If you find power tools to be intimidating and have no idea how to use them, definitely find someone who has more experience. Interior designer Julie Khuu says that if you’re working on a project that involves cutting glass or electrical work, you should call in an expert. And when you’re painting or sanding, Rachel Mae Smith of The Crafted Life says that you shouldn’t forget to wear a respirator and protective eyewear.
3. Ensure that form meets function.
Visit Page
https://www.hunker.com
Image Credit:
Carrie Waller for Hunker
Julia Marcum, from the Chris Loves Julia home design blog, says that with every IKEA hack you do, you should consider its function as much as its form. For their “fauxdenza” IKEA hack — using IKEA’s Akurum wall cabinets (since replaced by the Sektion system) — Marcus says “it was all about a storage option that was also attractive.” Consider giving your IKEA hack a purpose that goes beyond simply looking good.
4. Avoid IKEA’s college dorm pieces.
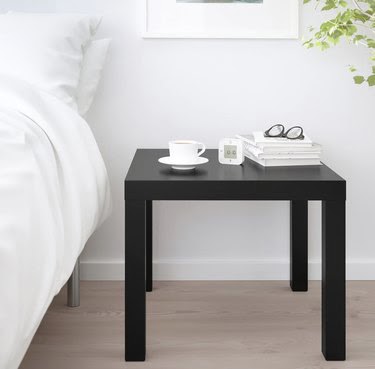
Image Credit:
IKEA
Wood says that DIYers should steer clear of IKEA college dorm pieces (like the Lack table and Poäng chair). “These pieces will forever be associated with IKEA,” she explains, pointing out that certain items will be harder to transform into something that looks completely unique to your home and DIY style. So if you don’t want your furniture to remind guests of their college years, you might want to stay away from dorm room staples.
5. Take your time and don’t rush, especially when preparing and sealing.
Visit Page
https://www.hunker.com

Image Credit:
Trisha Sprouse for Hunker
According to Sprouse, achieving a professional look for an IKEA hack requires patience, especially during the painting process. “A good rule to follow is that the quality of your end results depends on your preparation,” says Sprouse. “Cleaning, sanding, and priming are always necessary before painting to ensure a smooth and durable finish.” To give the item a polished appearance, Sprouse highly recommends applying a top coat (polycrylic, wax, lacquer, etc.) (like she did with the beautiful upgraded Tarva dresser using dowels).
6. Sand and prime before painting.
Visit Page
https://www.hunker.com

Image Credit:
Carrie Waller for Hunker
Another painting tip is to prioritize sanding. Khuu suggests that the first step for a flawless finish is proper sanding. Following that, Khuu advises using a water-based primer tinted in the same color as the paint. For a light or white finished coat, use white primer, and for anything black or a different color, use tinted gray primer. Smith also suggests using a deglosser or bonding primer, but sanding is usually sufficient. “After sanding, make sure to wipe off any dust or dirt with a damp lint-free cloth or tack cloth before painting,” she adds.
7. Invest in high-quality painting tools.
Visit Page
https://www.hunker.com

Image Credit:
Caroline Burke for Hunker
To achieve a professional-looking result, it is essential to use the best tools for the job. Sprouse advises spending a few extra dollars on a high-quality paintbrush or roller. “It’s absolutely worth it to avoid constantly picking out brush hairs from your paint job or trying to smooth out brush strokes,” she explains. For more painting tips from Sprouse, you can refer to her article here.
8. Take advantage of chalk paint.
Visit Page
https://www.hunker.com

Image Credit:
Trisha Sprouse for Hunker
“My best painting trick is to use chalk paint!” says Sprouse. “It’s particularly great for IKEA pieces because they usually have durable topcoats that would otherwise require sanding or deglossing if using other types of paint.” Chalk paint has excellent adhesion properties, and according to Wood, it provides a forgiving finish. If you want to learn more about chalk paint, Sprouse has written a comprehensive guide on Hunker.
9. Only paint on raw wood.
Visit Page
https://www.hunker.com
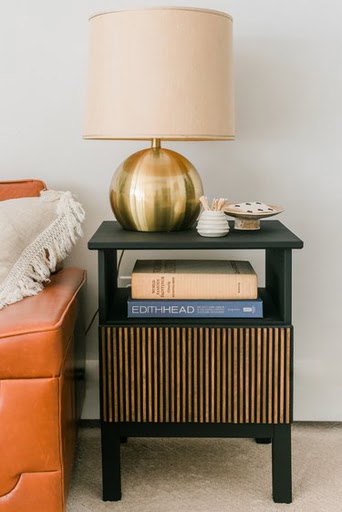
Image Credit:
Carrie Waller for Hunker
Wood emphasizes the importance of painting only on raw wood to prevent chipping. This means using pieces made of unfinished wood, such as crafted pine. Smith mentions her dresser DIY project as an example, stating that she prefers working with IKEA’s unfinished wood pieces. “They provide a great base without requiring extensive sanding, and the paint adheres better,” she explains.
10. Try out your paint beforehand.
Visit Page
https://www.hunker.com
Image Credit:
Jeran Mcconnel for Hunker
If you’re unsure about how the color will look on the object, it is important to test your paint first. Anna Evgeniou from the Minimalista DIY YouTube channel advises trying out the paint on a less noticeable part of the object before proceeding. This can help you avoid having to start over if the color doesn’t turn out as expected.
11. Conceal your seams effectively.
Visit Page
https://www.hunker.com

Image Credit:
Caroline Burke for Hunker
If you’re adding trim or molding to your IKEA item, it is crucial to ensure that your seams are well-sealed and camouflaged. DIY design blogger Erin Spain recommends paying attention to this detail, as a protruding seam can ruin the overall appearance of your piece.
12. Consider incorporating texture.
Visit Page
https://www.hunker.com
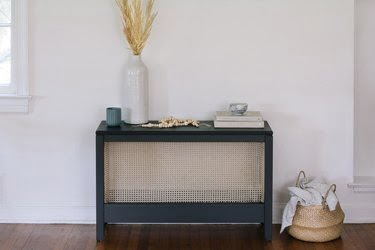
Image Credit:
Trisha Sprouse for Hunker
According to Smith, IKEA hacks should involve more than just a fresh coat of paint. Adding a textured element, such as caning or additional wood to create a pattern, can significantly elevate an item. Smith suggests exploring furniture websites for inspiration on current trends. Check out Sprouse’s caning IKEA hack for Hunker for some ideas.
13. Experiment with different feet and hardware.
Visit Page
https://www.hunker.com

Image Credit:
Sara Albers for Hunker
Wood advises paying attention to the details to enhance the look of your IKEA pieces. Feet and hardware are great areas to start with. You can consider sourcing vintage drawer knobs or browsing Etsy for unique furniture feet that can add a personalized touch to your IKEA item. Marcum supports this approach and suggests prioritizing the upgrade of hardware, as it can add personality to your piece.
14. Seek professional assistance for kitchen cabinets.
Visit Page
https://www.hunker.com
Image Credit:
Brandon Stanley
When it comes to kitchen cabinets, Wood suggests seeking help from professionals. She explains that there are companies that specialize in providing faces and upgrades for IKEA kitchen cabinets, which can greatly enhance their appearance. Wood recommends Semihandmade, a company known for transforming IKEA kitchens into custom-looking ones.
15. Explore your local thrift store.
Visit Page
https://www.hunker.com
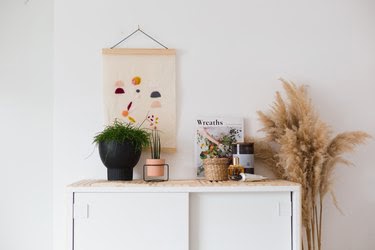
Image Credit:
Francesca Stone for Hunker
Both Khuu and Sprouse recommend incorporating vintage pieces when styling your IKEA items. They suggest searching local thrift stores and flea markets for unique accessories in raw finishes like concrete, clay, marble, or unfinished wood. Khuu also shares her personal preference of filling thrifted clay or glass vessels with outdoor branches from her courtyard, which adds a sustainable and chic touch to the design.
16. Divide surfaces into thirds for balance.
Visit Page
https://www.hunker.com
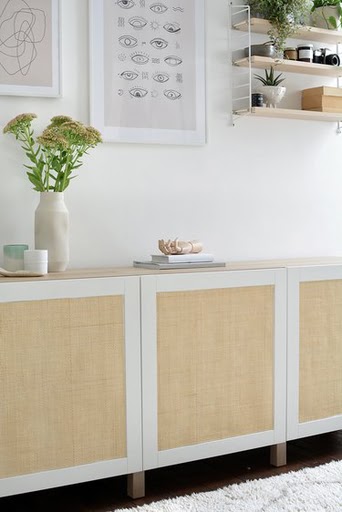
Image Credit:
Caroline Burke for Hunker
When asked for her top styling tip for IKEA hacks, Smith suggests dividing surfaces into thirds to create a balanced look. This concept is based on the “rule of thirds” in photography, where a space (such as a wall used for displaying photos) is divided into thirds horizontally or vertically, and the most important items are placed within that grid.
17. Use an odd number of objects.
Visit Page
https://www.hunker.com

Image Credit:
Carrie Waller for Hunker
When styling your hack, both Spain and Sprouse recommend using an odd number of objects instead of an even number. This follows the “rule of three” in interior design, which suggests that objects arranged in odd numbers are more visually appealing. They also suggest using objects of varying sizes.
18. Shop within your own home.
Visit Page
https://www.hunker.com

Image Credit:
Francesca Stone for Hunker
In the spirit of DIY, interior stylists Kathryn Hawkes of House of Hawkes and Linda Dekkers of Live Loud Girl — the creative forces behind Fronteriors — recommend looking around your own home. You can always paint or reupholster something, so only buy items that are truly necessary. Similar to an IKEA hack, you may already have a piece in another part of your home that, with some upgrades, would be perfect for the space you’re currently decorating. It’s about seeing what you already own from a fresh perspective.
19. Seek professional help if needed.
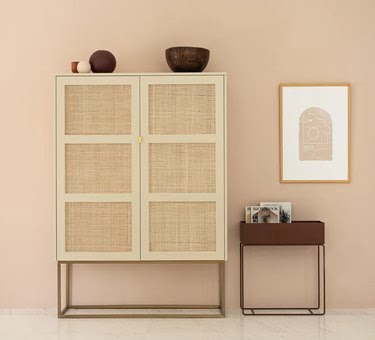
Image Credit:
Fronteriors
If you’re not comfortable with IKEA hacks, there are companies that can assist you. Home decor expert Alexandra Gater, known for her popular IKEA hack YouTube videos, recommends a few favorites: Bemz (sofa and chair covers), Pretty Pegs (replacement legs and doors), and Behang Fabriek (custom decal stickers for drawer fronts). Fronteriors, mentioned earlier, designs doors, sides, tops, handles, and legs that fit specific IKEA pieces.
If you want to change the appearance of items like cabinet doors but are hesitant to do the painting yourself, consider seeking professional help. “You can always find local services that offer spray painting for items like kitchen cabinet doors,” says Paul Anderson, Hunker’s Creative Director. Websites like Spray Net can also assist with these needs. Spray painting provides a smoother finish and avoids visible brush strokes, offering a unique look for your IKEA hack without having to purchase entirely new doors.
